After a healthy smattering of posts I seem to have run out of things to talk about… Or I’ve been working diligently on gift projects I can’t yet discuss. ‘Tis the season.

image

Today I’d like to share an interesting website I just stumbled on via Pinterest. It’s called Unsung Patterns: An Archaeology of Home Sewing. The image above is from this post on, of all things, corset bags. It appears to date from the 1910s or so and features an embroidery design bag. The bag itself is made from a strip of fabric 9″ x 1 1/2 yards long, folded in half and stitched on the long sides.

I must say, though I store corsets and have seen modern commercial versions of bags (usually one side is clear plastic), it never occurred to me to make one. My corsets tend to live folded into large handkerchiefs. Silly me.

Other entries on the blog feature some other unique items, including early 19-teens aprons, 1930s pirate costumes (not as bad as you might expect), a 1920s Martha Washington costume, some German patterns and a variety of early century work wear, all with a little history and background included.

image

I’m rather interested in aprons right now, so this post on a 1926 “Bungalow Apron” from the New Jersey based Aladdin Apron Company (great name!), with its musings on the possibilities of women going beyond the home sewing realm into cottage industry is particularly appealing.

It’s an interesting site to peruse. Enjoy!

Just when I’m researching 1930s corsets and extrapolating a 30s garment from a teens one, Mrs. Depew unveils one of the intermediate eras, the 1920s Foundation Corset.

image

It’s hard to see exactly how many seams it has, but I imagine it has four more in the back. The top line is part way between the over bust Victorian models and the shape of the 1911 corset. The bottom length and garters look to be long enough to both shape and smooth. Of course it’s slimming, or rather flattening… I’d say my 30s corset falls nicely in line.

image

Mrs. Depew does have their own 30s pattern as well.

model in an early 1930s Spencer corset

The 1920s are known for their idealized flapper girl, with her boyish figure. The waist had all but disappeared or appeared dropped from it’s proper anatomical location, making the hips seem slimmer, and busts were minimized. By the 1930s the waist was reemerging, lines were more graceful, curvier and the overall clothing more elegant and lady-like. The waist was back, but the figure was still very smooth and idealized. So what is a girl to do with her curves? This isn’t the Victorian era. Corsets weren’t employed by the general populace to completely rearrange the figure, but it did need it’s “unlovely” bulges smoothed out.
Lordosis Backline 1930s adYou’d be surprised what was considered unlovely bulge. According to one ad, the curve at the small of ones back was unsightly. It was referred to as “Lordosis Backline.” Wikipedia says that Lordosis is the normal inward lordotic curvature of the lumbar and cervical regions of the spine, but an excessive curve is commonly known as a sway back. I don’t know if the phrase “Lordosis Backline” was commonplace or a marketing ploy used to exploit a real condition, but more women than not, wore their foundations 14 – 16 hours a day.
Spencer corsets 1939
Another ad has a little girl asking her mother if she will “stick out” like her when she’s older, with dad looking on, snickering. How, pray tell, do you get rid of that curve, that “figure fault”? By smoothing out the backside! Look at images of Hollywood starlets in their 1930s evening gowns and you will notice that the bum was not at all prominent. In fact it’s lack was a little boyish. Restricting undergarments went all the way down over the bum or to the thighs.
Take a look at these before and after images of a woman who had pretty minor “figure problems”:
Spencer_1941_2

This is the beginning of the switch from corsets to girdles and the era saw a surge in pre-made garments and professional made-to-measure items. Inevitably there were some holdovers to the tried and true corset and others may have desired more “smoothing” (more here meaning corseting, compression), hence the variety.

The biggest factor in going from corset to girdle must have been the wider range of fabrics available. Corsets of the previous centuries could only constrict. In fact there is a fabric made specifically for corsets. It’s woven in such a way that it has almost zero stretch. It’s called coutil and is traditionally a very tightly woven herringbone (there is a more modern satin as well). Real, good quality corsets, even today, are made with coutil. Period. There can be a fashion fabric outer layer and a lining, but if the main material isn’t coutil (and spring or spiral steel bones, but that’s a different conversation), it won’t last and the shape it gives you won’t stay true. With the advent of man made fabrics girdles could be made that smoothed and gently compressed, but allowed the wearer more range of movement. Some garments were constructed mostly of coutil with some stretch (possibly elastic or the period equivalent of power-mesh) added in gussets across the thigh and sometimes as a top band. I think of these as transition garments and this is what I will be making for this 1930s project.
If you do a search for “1930s corset” you aren’t going to get many hits. Search “1930s girdle” and you’ll get some. Search for a specific company’s garments and you’ll get a lot more info. Try “1930s Spencer” and you start to get somewhere. Better yet, visit Corsetiere.net and you’ll get a plethora of information on various companies’ garments through their history (through today in a couple special cases!).
Not finding an period corset patterns, but finding many ads for corset makers of the times, tells me that corset making as a home art was largely dead or dying by the 1930s. There are some patterns for period girdles, but I’m not looking for stretch in this case, nor was every woman at that time. There is nothing that says I can’t make my own 1930s corset, so I will.
As for the shape of the 1930s foundation garment, whether it’s a corset or girdle, it hadn’t changed much from the early century. It was long at the thigh and came to some height between directly under the bust and the waist. The single bra+corset/girdle garments are not something I want to try as a first shot and some are actually a long line bra over a corset/girdle.
What I’ve found are several patterns or variations on a couple patterns from about 1911-12 that I plan to test as is, then modify. One has 5 panels per side and will be my basic model. Another has a couple shaped gussets included. While I like the latter’s shape, the pattern doesn’t lend itself to enlargement as easily as the other. My plan is to make the 1911 and figure out the gusset placement, modified for power mesh or the like, after.
See related posts:

Here are the rushed, but final pics from the dual purpose corset, version one.

image

This corset was developed and made in a hurry to get our gal closer to the Victorian shape. The first project was a Victorian-esque costume. More details on that later. It reduces her waist by 4″.

The corset is made of heavy ticking fabric. That’s not ideal for a corset. As I’ve said before, there is no substitute for coutil. Since I didn’t have any white on-hand I had to substitute something heavy that would stretch as little as possible. Ticking does stretch, but less than denim and less than plain weave canvas.

Nope, not removing the orange markings. I said down and dirty and fast and I meant it. I can remove them after Halloween.

image

Above you can see some of the garment seams covered by bone tape, which is a flattened, heavy-duty, tube of fabric. About 1/8″ in on both sides is an indented channel, which is a sewing guide. There really is no substitute for this stuff either, at least not if you are making a sturdy garment that will shape the wearer. It encases the bones which are 1/4″ spring steel. The front opening uses 1/2″ spring steel bones.

The other thing you’ll notice is the black ribbon at the waist. This is called the waist tape. It is technically Petersham Ribbon. It’s a ribbed ribbon similar to grosgrain ribbon (but that is not a substitute). I’m not entirely sure, but I believe those ribs are woven, unlike grosgrain, which I believe is imprinted. Don’t quote me on that. The ribbon is not stitched down along its edges; it’s only attached where ever the bone tape crosses it. It serves as a floating anchor, taking some of the strain of the waist, which has the most tension. This is key since I had to use inferior fabric.

There is one bone on each side that does not completely cover it’s corresponding seam. This is unfortunate because that seam will fray where uncovered. However, the bone only needed to extend down part of the seam, so I didn’t waste the tape. Several of the other bones are in fact shorter than their casings.

image

Ideally I would have used a busk opening, but I didn’t have one the correct length. Busks make getting in and out of the corset much easier. Later corsets used some materials that had stretch (though they often used coutil in conjunction), which allowed them to use other openings like hook and eye.

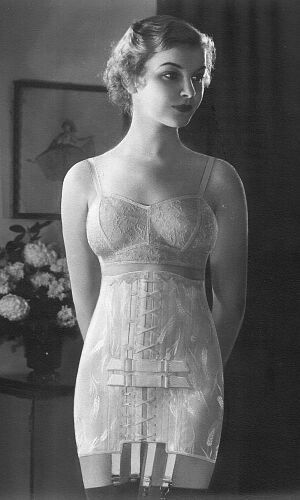
What makes this more of a 1930s corset is the shape and length. It goes from natural waist to hips. It shapes, as corsets are meant to do and, the length – completely covering the hips and bum – also smooths, which will help achieve the 30s smooth and minimized bum silhouette.

Version two will be made of coutil and a bit of power net at the top of the thigh to aid in walking and sitting. It will also feature garters. Most importantly it will be front opening and back lacing. I plan to use button holes instead of the standard grommets (heavy duty ones are used, not the cute little ones you find in the usual fabric store). My theory is that the button holes and a flatter cording will give a less noticeable opening, which is ideal for the streamlined garments of the 1930s.

Related posts:
First look at the 1911 corset

Here are my first two versions of the 1911 corset, for two very different figures.

image

This striped version, deceptively displayed on a much smaller dummy, is for a lady of a completely different shape. She has a shorter torso and more curves. It has lacing bones, which are panels with heavy interfacing and grommets and 1/2″ spring steel bones that I can quickly sew into any mockup for fitting purposes.

image

image

The green version is from the earlier pattern comparison with the Laughing Moon Victorian underbust corset. This figure is closer to the dummy, longer and narrower.

It is worth noting that, to achieve the 2″ (5cm) gap in the back, you need to subtract 2″ from your measurements before you choose your size. More if you have more squish factor.

On both versions I notice that the under bust portion is far too big around. Both figures have narrower underbusts than waist measurements. I’m not sure why it would be designed larger there, except that perhaps the ideal was still more Victorian.

The UB to waist ratio decreases as the overall size gets bigger, but at no point (to the modern figure? Or at least my two test subjects) do those changes seem logical. The stripped version actually has a change in proportion in response to that issue.

Overall I extrapolated through size 66. Contact me if you’re interested in my spreadsheet or how I applied the increases. Per the results of the green version I’ll be applying some decreases to that version next.

The stripped version is the one that matters at the moment and version 1 was pretty successful. In the second and last version I’ll be:
1. changing the front hem shape to accommodate the shorten waist length when she sits
2. shortening the UB area to match her proportion
3. taking in the first two seams about 1/2″ at the bottom to follow the curve inward
4. Last, and biggest, I’ll be decreasing the width of the back pieces 2″ (it’s going to be front and back opening) and will be decreasing the seam between the first and second pieces maybe 1/2″ at the bottom, which will change the pieces shape a little. The last has more squish factor.

None of the changes will happen in that order.

A couple other notes: This corset is being made in heavy ticking. It’s not meant for this kind of garment (or any garment), but with its tight weave, it’s better than denim. It isn’t better than coutil, but time is of the essence here, so we’re doing this quick and ugly. The boning is going to be a little random; whatever I have on hand. She wants a front busk and I think I have one of the correct length, but if not, we’ll have to lace. I’m planning to use buttonholes instead of grommets. We need to keep the holes small to give a smooth look, but small grommets tend to be wimpy.

More soon!

image

These patterns are the 1911 corset from Bridges on the Body and the Laughing Moon #113 from 1900-09.

First, the caveats: 1. this is an unfair comparison – sort of. The two patterns are clearly very different garments, but both are under bust corsets of sorts, 2. The two patterns aren’t quite the same size. The bottom (1911) is larger by almost two inches at the waist and hips, and 3. The bottom pattern does not currently include a seam allowance at the front or back. 4. I have the back piece of the LM to far too the left. The grommet holes are in the solid fabric of the 1911.

I’ve made the LM several times and like it overall. Being a waist cincher and having only one set of curves, I consider it a good basis on which to judge other similar garments as I did with an Elizabethan corset here.

Focusing on the back pattern, the 1911 which is new to me, what am I noticing in the two patterns?
1. The 1911 is quite short in front top and rather tall in back. Since I personally find the LM to be short, this is going to be a problem.
2. The 1911 is really long at the bottom. Something like 19″ overall length at this size (a 42 waist / 44 hips, which translates to about 30″ waist / 40″ hips). You aren’t seeing the suggested boning placement. I’d say they are similar in length to a typical Victorian corset. This leaves quite a bit of material as a form-fitting skirting piece, which should make for smooth lines. I’d say this will go all the way past my bum. The unboned skirt will be about half the total length.
3. I don’t know where they are measuring the hips exactly. Logically it should be where the pattern looks largest, but logic doesn’t always prevail. The fact that I had to make my usual one size jog between waist and good tells me it’s probably going to work for me.
image
4. The individual piece shapes look logical to me and match those of the LM reasonably well. There are two pieces in the back, a sort of side-front and two fronts. The skinny piece next to the front on the LM (which you can see lapped by the third in the image above) never made much sense to me, but might if it were a full corset.
5. There is a busk in the front, but it looks like the back could either go solid and non-opening (which i don’t think they did) or have traditional lacing.

Of course I have and to complicate things and I won’t be content to make the garment as is. My plan is to use this as the basis for a 1930s corset. I will be making it up in coutil with power mesh inserts.

Next step – a mock up.

We’re starting a fun new project – creating a mini-wardrobe for a woman who is a docent at a local historical site, Hearst Castle.

Myrna Loy in When Ladies Meet - 1934

Myrna Loy in When Ladies Meet – 1934

The docents wear 30s attire and our docent prefers the early to mid period, when the clothing was flowing, elegant and feminine. I like that the period also mixed in harder lines with interesting seams, buttoned bits and unique necklines. Our docent has requested up to four outfits – a day dress or two, an evening dress and pajamas (PJs weren’t just for sleeping – they were for lounging, as they can be today, and beach-wear). We’ve added one very important item – a corset or girdle. More on the specific garments later.

I’ve always loved the elegance of the 30s gowns. The sleek, body hugging lines of a bias cut, the low backs and the glowing fabrics. At the top of my fabulous fashion list are Myrna Loy (If you’ve never seen The Thin Man, I highly recommend it. Myrna was as smart and sassy as she was fashionable. She made the difficult role of straight-man look effortless, including the occasional bit of physical comedy) and Ginger Rogers (who, rather famously, “did everything he [Fred Astaire] could do, but backwards and in heels” – I wish I could remember who said that). Even their day-wear in films was elegant, as the clothing of our docent should be. They are portraying the guests of Mr. Hearst and could be anyone from a starlet to the wife of someone who worked at Mr. Hearst’s magazine.

So where do you go if you want some accurate reproduction 1930s clothing? It turns out that is a very good question.

(more…)

westminster-corset

“Westminster-corset”, the QE1 Effigy corset (not from the Sittingbourne cache)

I had absolutely no intention of writing a post this evening, but a post on the importance of independent labels and locally made goods (specifically in lingerie, but really in any goods we consume), led to some interesting lingerie sites, which led to a fitting guide, some Elizabethan corset history and eventually to a rather detailed image of an early 1600s corset from the Sittingbourne cache.

The Sittingbourne Cache is the collective name given to a large group of artifacts found within the fabric of an old public house in Sittingbourne, Kent, in the south-east of the UK, shortly before the building’s demolition. The cache, consisting of over 500 artefacts, is the largest reported to the DCGP [Deliberately concealed Garments Project].

via http://www.concealedgarments.org/2010/10/sittingbourne-cache/

More after the jump (more…)

corset rough

Elizabethan corset with tabs

I finally broke down and decided to make an Elizabethan corset. My character is moving up in status and my bodice is uncomfortable. Short straps lead to tight armholes!

For this particular garment I am trying out a couple things:

  1. “budget” coutil
  2. the #1 Greist buttonhole foot for a late 60s straight stitch machine (mine is a Kenmore 158-1652, circa 1968)
  3. 1/4″ steel bones (as opposed to using a couple 1/2″ bones, which is common in Ren Faire bodices).
  4. making my own bias tape

Using the Maunta Maker Elizabethan “pair of bodies” pattern that I previously compared to the Laughing Moon late Victorian waist cincher pattern here and my updated measurements, I redrew the pattern to fit my proportions.

More after the jump.

(more…)

Image

Corsets from different periods mold the body into very different shapes, which is why it’s important to wear the correct corset for the correct time period. My grandmother used to refer to undergarments as “foundations” and indeed, real corsets – the ones meant to change your shape – are exactly that. You can’t create the correct period effect with your costume without first having the right foundation.

More after the jump. (more…)