I did make quite a few garments for this year’s Faire Season. The following one of  three costumes started in March and completed in time for our home faire in July. It was also one of the most complicated projects I’ve worked on, to date. It currently totals seven pieces, in six colors and three different different fabrics.

DSCF1868crop

Meet Demetrius the Griffin

Demetrius is a friend of a guild member, who I first met at a Renaissance Faire gone Baroque Piracy, last March. I gave him one of my business cards and the emails began.

His goal was to dress as a Traveling Merchant of the Renaissance Era. He had many ideas and 3 concept drawings, which he sent copies of. Two of which are shown below.

bluehasia_character_wip_by_theblack_arrow-dc6rr2g

Concept Sketch

demetrius_the_merchant_by_m4wie-dc79wy6

Full Color Concept Drawing of Demetrius the Merchant

Through emails we planned the minimum pieces he needed , that I could make. One robe with vents for the wings and tail, pants, shirt, a faux shirt or dicky, a hat and a coin pouch.

We then met for measurement taking and fabric selection. The original idea was to dress him in neutral tones of brown and grey. After some discussion we broadened the color palette, to a light grey shirt, light brown or tan pants, a dark blue robe with gold linen trim, a tan hat with gold trim, and a gold coin pouch with a blue rolled hem.

In this post I will discuss 2 of these pieces, the pouch and the hat.

IMAG0919.jpg

Coin Pouch

The simplest item to make was finished first. This was the coin pouch. Two pieces of gold heavy weight linen trimmed with a blue woolly nylon rolled hem, and  a casing stitched for the draw string.

The hat was the second item of this project to be completed. It is a cone shaped hat From a Victorian Santa Claus Pattern, that I modified.

In the drawing the hat would sit between the ears and drape over the back of the head. The color would match the robe and be trimmed in grey faux fur. We changed it to be the same color of heavy weight Ginger colored Linen. and trimmed with a wide band of Autumn Gold heavy weight linen. The band was doubly interface to ensure it wound stand up.and the cone was lined to give it more fullness in draping.

Hatfinal

The Hat is Finished with a Gold Colored Feather

As you can see the completed hat does not sit between the ears. We could not find a way to hold the hat in place without using bobby pins or something else that would pull out Demetrius’ fur, or require attempting to pin it to the mask, which could stap the head within, or pull out fur, in the pulling out the pin.

For now at least,  the hat sits on one ear, with a feather in the band.

Here’s another item I made this year, but failed to blog about.

image

Finished dress front

This dress started with the fabric. I bought a three yard remnant with vague ideas of making a dress from it. When it came down to actually making it I quickly realized that I didn’t have enough fabric. Color blocking seemed the obvious solution. I went with a lighter shade from the print to keep it lighter for the late summer wedding I’d wear it to.

I wanted a fuller skirt, but longer than any pattern I had. I settled on an original 40s dress bodice and a reproduction ’61 dress skirt, lengthened. The bodice had a back zip and the skirt a size zip, so I’d move the skirt’s to the side and still managed to put pockets in. Every skirt needs pockets. I did a mock up in a flimsy, ghastly, mustard cotton and it looked like things were going about to plan. Then things went wrong.

The 40s bodice had an obvious spot to color block, the yoke and collar were one piece, so I’d do that and the bottom 1/3 of the skirt in the solid light blue. What I didn’t realize, even after the mock up, was that the way the arm holes of the bodice were cut, which allows for quick construction and was fairly shape confirming in wimpy cotton, would be stiff and look at least one size too large when made in two layers sturdier fabric. It was almost done and I hated it. Hated it. It was frumpy on me and the extra fabric under the arms didn’t help.

image

Original 40s dress bodice

What I should have done was cut the yoke in the print and done the fold over collar portion in the light blue. Then I would have merely been disappointed with the arm hole fit.

It was one day before the wedding and I couldn’t wear it the way it was. Thereafter ensured a flurry of seam ripping to get the maximum possible fabric (ripping all of the top stitching so I could iron out every millimeter of the main torso pieces) and fiddling, this way and that, with what I had left. The pockets has taken up too much fabric because I tried to hang them from the waist seam inside. Ultimately this wouldn’t work and I’d cut them way back, thereby waisting a bunch of the print fabric. Grrr. I had absolutely nothing extra and no pieces that would cover the length of my torso, front and back.

So it would be a yoke after all. But how would I make the color blocking tie in? I tried several patterns in my stash and nothing quite worked. The 40s pattern was too shapeless, meaning that no other arm hole would work with the way the fabric had been cut.

image

The only solution was an entirely new bodice. I didn’t have a plain basic bodice pattern in my size. I had to make one, fitting it with my husband’s assistance (which mostly involved him taking pics so I could see what was going on). I turned the bottom half of the originally cut bodice sideways and with one decently sized scrap came up with a single piece full front piece.

While trying to get the mock-up on I simply cut a slit down the back, from the neck hole, thinking I’d decide on the neck shape once it was on me. That’s when the ah-ha moment happened. The slit could stay, faced with the light blue to match the skirt’s color blocking.

image

From there it was just a matter of binding the arm holes, stitching down the lining inside the yoke, attaching the bodice and skirt, putting in the zip, trimming off three inches of the bottom of the skirt (because the length of the 40s skirt really looked so much better in sturdy cotton) and hemming. Oh, and make a narrow self-fabric belt.

Finished just in time, I wore it with a full tulle underskirt and self painted, fabulous, blue heels, but those are another post.

image

Finished dress back

I’m not entirely sure what makes this design Japanese. Perhaps the clean lines and simplicity?

image

This particular bag (version two) was made as a gift with fabric form the stash that was originally used to make a very cute mid-sized purse, also a gift. I don’t think the photo quite does the fabric justice. It’s a fall colored batik, with a little bit of maroon, or possibly burgundy. I’ve lined it with a simple, small, floral done in maybe four shades of cream.

image

The bag is fairly small, but a great size for grabbing a few things to go, lunch, or a skein of yarn for a project. The longer strap can be hung on the wrist with the yarn end sticking out so the skein can be kept in check (and away from naughty felines) while you work.

Here are a few more I’ve made recently.
image

They’re also reversible.
image

Here’s version one, which I decided I dislike making. Putting on the round bottoms is too fiddly.
image

image

image

image

No felt on the back of this one. Haven’t decided if I like it on the hat with the existing bow or not.

image

image

image

image

image

Here’s a smaller one with loops that are one and a half times the ribbon width.

image

I found the felt, so this one has a slightly smaller round of felt on the back that I can use to anchor the loops.

image

For the last few years my intention for gift giving has been to make as much as possible myself or buy from artsy friends or people at craft shows and online marketplaces like Etsy. With the exception of books (of course), electronics, music and other similar things. The idea is to give more thoughtfully and more specifically.

image

image

image

The downsides to making and buying handmade are that I have to come up with ideas for items people will really like – I have to know them pretty well in some cases. I also have to plan way ahead. If I come up with an idea too late I might not have time to pull it off or it may be too dissimilar to the other things I’m making, increasing the time all around.

image

This year I spent to much time on a doomed gift (a huge crochet project that I probably won’t finish until June now), made two dopp kits and five aprons, and bought one pair of electric toothbrushes. In typical fashion I undertook a new pattern, graded another up a size, created several custom graphics that were overly complex for the application, and used a technique I only had vague experience with. I completed my last task, setting the graphics on two of the aprons, Christmas morning. I also forgot to buy wrapping paper (which I like the look of, but always feel so wasteful for using…) and had to wrap gifts in crumpled brown paper and tissue paper I had on hand.

image

image

image

image

Things turned out pretty well, though I made the mistake of buying twill for the aprons. It was a mistake only because the vinyl stencils didn’t stick perfectly to the slightly textured weave and images were not 100% crisp. I didn’t do the graphics on the Hawaiian fabric aprons (which I also didn’t take pics of apparently), but they weren’t lacking. I did turn the white flowers slightly pink pre washing the fabric, which is still bothering me, obviously. (Must remember to try those Tide color catcher sheets). I didn’t finish the inside of my husband’s dopp kit or get to wax it, but it looked good and came home with me anyway.

image

image

image

All in all the gifts were received well. Would I want to repeat the Food Seasons in New Orleans graphics in exactly the same way? Maaaaybe. I need to work on my process in getting complicated stencils from the sticky cutting mat to the project surface. I’ve used stencil transfer paper, but I find it to sticky. Next time I may try some clear vinyl over my stencil instead.

Now that Christmas projects are over Happy new year!

Usually I make a big deal for Halloween. The house gets decked in its bi-yearly theme (witches) for one night. All the monsters come out, revolting amounts of candy are handed over and much coffee is consumed by dedicated parents. This year, however, the Rogues were sewing and doing a final fitting until 4pm. Here’s what we made.

image

A Victorian costume, complete with corset, walking skirt, apron over-skirt and tailcoat jacket. The majority of the costume is a heathered gray cotton of mid-weight with trim in blue poly satin and some matching blue braid.

image

The tailcoat is based on a tailcoat vest I made for a previous Halloween costume, which was based on a simple princess seamed vest pattern. The overskirt is a 1871 pattern from Truly Victorian, which we changed to be reversible (gray on the other side), the skirt is based on an 1895 skirt and includes period accurate pockets! They hang inside from one central point and are accessed by a slit in their center.

image

The piece you aren’t seeing is the under bust corset, which can be found here.

I’m pretty happy with the way the tails hang gracefully. The decision not to line them was a good one. I think they would have looked to heavy. The front of the coat will hang better without the overskirt beneath it.

The other part I’m particularly pleased with is the trim on the sleeve cuffs and apron hem. It’s the same gray as the general ensemble, pleated. I was initially going to put a strip of blue fabric over the seam of the cuffs, but happily found that nice blue trim.
image

This was a fast project and there were lesions learned about fitting, allowances that must be made for corsetry (we almost always steampunk and wear out unmentionables on the outside), equipment limitations, the squirelieness of satin, and timing.
image

In the future we would like to make some small adjustments to the apron to make it truly reversible, add some blue braid trim to it’s ruffle and probably make an alteration to the skirt.

And that’s not all. We also did some tailoring to the lady’s husband’s Victorian ensemble; adding pockets to his vest, hidden pockets to his tailcoat and Henning the pants. I’m sure they were quite a pair.

Next year there will be better planning and timing so people can have their costumes and I can have my usual Halloween fun. (Not that we didn’t have fun, it was just compressed.)

Here are the rushed, but final pics from the dual purpose corset, version one.

image

This corset was developed and made in a hurry to get our gal closer to the Victorian shape. The first project was a Victorian-esque costume. More details on that later. It reduces her waist by 4″.

The corset is made of heavy ticking fabric. That’s not ideal for a corset. As I’ve said before, there is no substitute for coutil. Since I didn’t have any white on-hand I had to substitute something heavy that would stretch as little as possible. Ticking does stretch, but less than denim and less than plain weave canvas.

Nope, not removing the orange markings. I said down and dirty and fast and I meant it. I can remove them after Halloween.

image

Above you can see some of the garment seams covered by bone tape, which is a flattened, heavy-duty, tube of fabric. About 1/8″ in on both sides is an indented channel, which is a sewing guide. There really is no substitute for this stuff either, at least not if you are making a sturdy garment that will shape the wearer. It encases the bones which are 1/4″ spring steel. The front opening uses 1/2″ spring steel bones.

The other thing you’ll notice is the black ribbon at the waist. This is called the waist tape. It is technically Petersham Ribbon. It’s a ribbed ribbon similar to grosgrain ribbon (but that is not a substitute). I’m not entirely sure, but I believe those ribs are woven, unlike grosgrain, which I believe is imprinted. Don’t quote me on that. The ribbon is not stitched down along its edges; it’s only attached where ever the bone tape crosses it. It serves as a floating anchor, taking some of the strain of the waist, which has the most tension. This is key since I had to use inferior fabric.

There is one bone on each side that does not completely cover it’s corresponding seam. This is unfortunate because that seam will fray where uncovered. However, the bone only needed to extend down part of the seam, so I didn’t waste the tape. Several of the other bones are in fact shorter than their casings.

image

Ideally I would have used a busk opening, but I didn’t have one the correct length. Busks make getting in and out of the corset much easier. Later corsets used some materials that had stretch (though they often used coutil in conjunction), which allowed them to use other openings like hook and eye.

What makes this more of a 1930s corset is the shape and length. It goes from natural waist to hips. It shapes, as corsets are meant to do and, the length – completely covering the hips and bum – also smooths, which will help achieve the 30s smooth and minimized bum silhouette.

Version two will be made of coutil and a bit of power net at the top of the thigh to aid in walking and sitting. It will also feature garters. Most importantly it will be front opening and back lacing. I plan to use button holes instead of the standard grommets (heavy duty ones are used, not the cute little ones you find in the usual fabric store). My theory is that the button holes and a flatter cording will give a less noticeable opening, which is ideal for the streamlined garments of the 1930s.

Related posts:
First look at the 1911 corset

image

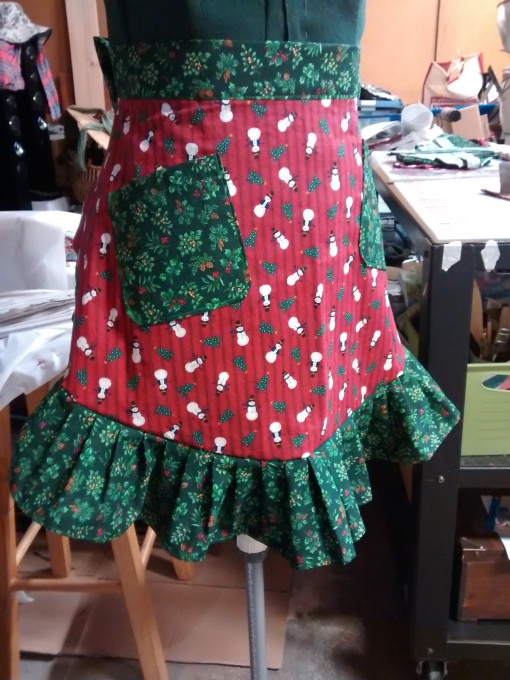
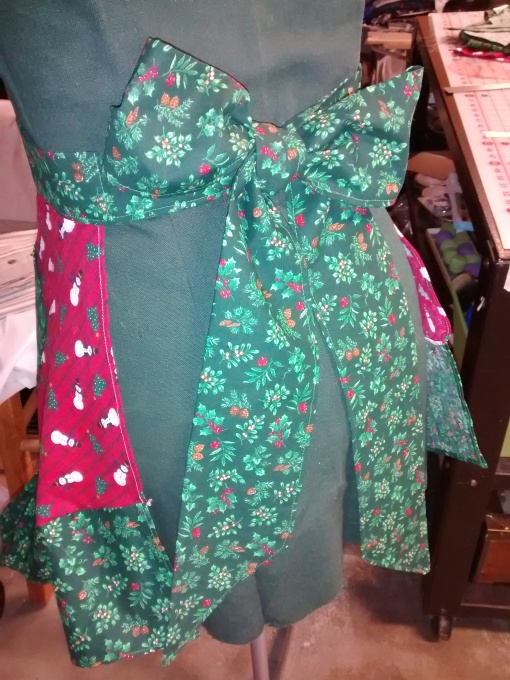
Red stripped fabric, little snowmen, Christmas trees, holy and other festive greenery. This apron has two pockets, a played flounce and a generous bow.

image

The Rogues will be participating in the  Halcyon Craft Fair Nov. 7 & 8, 2015 (10am – 4pm both days). We’ll have a plethora of aprons for sale, mostly of the Christmas variety, including the ones seen on this blog.
image

Come on out and see us and buy someone a handmade Christmas gift!