I don’t know why there is this decades long conspiracy to not give women pockets or to give us tiny, non-functional, or purely decorative pockets. You know the ones. It’s the pants with fake pockets in front, or worse, the “real ones” that are only two inches deep. It’s the jacket that only has pocket flaps. Or the expensive slacks with the well made pocket welts that appear to be stitched shut, but, when opened, don’t go anywhere. This has been going on for ages. I recently acquired a Victorian jacket that has a mysterious slit in one of the front seams. On the inside you can tell that it’s intentional. Turns out it’s for a pocket watch. It’s not a watch pocket, but a watch slit. Weird.

We are constantly told women didn’t have pockets historically. None in Victorian times (pocket watch slit not withstanding). None in the Elizabethan era. No colonial female pockets. But that just isn’t so. There are many examples in extant garments, paterns and paintings, showing conclusively that Women. Had. Pockets.

My theory is that, as various parts of our figures were being hidden in volumes of fabric, so were our pockets. If you can’t see them, clearly we must not have needed, wanted, or used them, right? And of course, what high class woman woman of leisure would need to do something so vulgar as to carry something herself. I also suspect that many women’s skirts and dresses, work-a-day ones that would have been worn out or remade, didn’t survive as often as the fashionable gowns that didn’t strictly need pockets. There are plenty of examples of women’s historical pockets out there, should you care to look. Check out this article on making your own at the V&A and one version of the sexist history of pockets via Medium.

For my Dickens Fair costume I decided to make a quilted, tie on, pocket. I did so because, 1. I don’t want to buy an appropriate bag, which were in vogue at that time, 2. I don’t want to make a appropriate bag, and 3. I don’t want to carry anything. I happen to think every garment should have a plethora of pockets. I chose to make an 18c size and shape quilted pocket because it’s pretty big (16″ x 10″) and I wanted to try out free-motion quilting (I’d never quilted a damn thing until the day before – I’ll get to why I tried it in a later post).

Some ex-sheets are not too bad a fabric choice for Victorian. The bias tape was removed from the bolero I plan to wear. I used all but maybe 6″ of it. Hooray for upcycling.

Huh, my fabric is sort of a combo of the middle top and left second row… I believe this image comes from Vintage Dancer.

My random quilting is ok if you don’t look at the various stitch lengths. There was no plan to the pattern and I basically went as fast as I could without breaking threads. I did learn that free quilting works best on my Kenny with the feed dogs up.

The finished pocket! I took my time and put the binding on correctly #notlazysewing

And there you have it. I have a historical pocket!. To use it, I’ll need pocket slits in my skirt and petticoats.

Dummy wearing a black dress to cover the fact that she’s disintegrating, my Laughing Moon pattern late Victorian waist cincher in silk and coutil, a bumpad and the pocket.

Next time: Son of Ugly Puffer

(The 18/19c Bumpad)

While planning for my quick and dirty Dickens costume, I piled “petticoats” onto my dummy, attempting to achieve some sort of vague fullness. I quickly realized that my sadly narrow skirts just weren’t going to cut it. I also couldn’t find my oddly stiff 360++ degree original faire skirt that I was considering starching into service. I tried cheating by adding a mid-length 50s tulle underskirt. That did add some volume, except the shape deflated from waist to hip and below the knee. Clearly I needed more volume! And in the right shape. This was an era of maximum fullness in skirts. I’m not portraying an upper class lady, but I reason that even most working women would aspire toward fashionable fullness when they go out on the town, to High Tea and whatnot.

Two petticoats, cheater tulle and a faire skirt standing in for the yet-to-be-made top skirt. What sad shape with fullness only in the middle third.

I researched the easiest way to get volume under my 1860 skirt and came across the American Duchess post about her unconventional underpinnings. I too find myself a bit lazy when it comes to underpinnings, impatient if you will. Her comments about always using a Bumpad and the “Ugly Puffer” seemed like an excellent place to start. I thought I’d make the bumpad, use the tulle, and add a 14″ flounce to the bottom of a tiered petticoat, for extra fullness (meaning I needed about 7y x 15″). The Ugly Puffer wouldn’t be necessary, surely?

I first tackled the Bumpad. Using the three section idea from American Duchess and the shape of one on the Laughing Moon #112 Bustles and Hoops pattern, but making it like 8 sizes bigger, I got to work. My materials were a remnant of white dotted cotton, some grograin ribbon, stuffing and a zipper, all from my stash. I didn’t know how much to stuff the bumpad, so I decided the best plan was to make it changeable. Hence the zip.

Only being a two piece item, the Bumpad came together easily. I hadn’t done a zip in ages and managed to leave the top and bottom bits a little outside the seam. Meh. Only I’ll see (#lazysewing). Once stitched together and tried on, I made some stuffing adjustments, took the stuffing out, stitched the seams for the sections and restuffed it. Accomplishment! (Sometimes it’s the little things).

The waist could have been more curved. I hadn’t stitched the sections yet in this pic.

Dummy is now wearing my late Victorian waist cincher (Laughing Moon pattern) and the Bumpad. I don’t have a full corset and am not making one this go-round.

The more full petticoat, Bumpad and stand-in top skirt. Not bad, but a little butt-focused and deflated at the front and sides.

Under the petticoat it did make a big difference, but it was bustle-like and the petticoats still lacked the right fullness. The tulle was already out because it didn’t fit over the bumpad. I’d been hunting up enough fabric for that huge flounce and was unhappy with my options. Perhaps I could skip that extra flounce and make my own Ugly Puffer… By making one more thing I’d have one less thing to make??? What was I getting myself into?

Next time: Bonus pocket

Later: Son of Ugly Puffer!

In the last year, year and a half, I’ve done basically no sewing except fixing a button, then fixing several the buttons on the Lord Mayor’s doublet, then adding more tacking to the slashes on his sleeves and doing little stag thorn stitches over that.

And then people got serious about Dickens Fair. We’re going for a weekend and we’ll be paying, so we can wear what we like, instead of 1840-60-ish. I’d like to make a Gothic period 1840s dress, but what if I never go again? On the other hand, I don’t want to wear a steampunk costume (as much as I’d enjoy pulling that one out again). My compromise is to be 1860-ish in a blouse and bolero I have, a hat I’ll alter from a blank and a skirt I’ll make. Hat and skirt. Simple, right?

Thus began the trip down the rabbit hole, researching, planning, generally going off on tangents and changing the plan. I researched:

  • How not to have to wear a hoopskirt
  • 1840s Gothic
  • How wrong are the sleeves on my bolero and do I care?
  • How to fix the heels on my expensive Victorian boots because apparently no one will do it locally and I can’t find replacement heels anywhere on the interwebs
  • Construction of fan bodices
  • Bust padding (because apparently everyone had to pad the space near the arm hole in 1830s bodies)
  • How to make corded petticoats
  • Sewn in padding in the bums of early Victorian skirts (it’s a thing)
  • How to hem from the floor up (where has this been all my life?)
  • How bodices and skirts were attached (or not, depending)
  • Full Victorian corsets with me in mind, as in not making one for someone else for once
  • Period bonnets hats
  • Fabric selection for 1860s skirts
  • Fabric choices and skirt widths for fashionista vs. working women
  • A whole slew of things related to fabric and patterns in the 1880s (unrelated, but fun – I’ll tell you later)
  • My sad lack of petticoats and the non-period skirt shape I was going to end up with
  • The Bumpad
  • Pockets and pocket slits
  • The “ugly puffer” via American Dutchess
  • Period flower prints for fabric and how not / close is the pattern on those old sheets I have in the stash?
  • Whether Beverly’s takes competitors coupons, because I was headed that way
  • Quilting, free motion quilting, because I cheaped out and couldn’t make myself buy prequilted fabric

And so, dear folks, after thinking I was only making a skirt and considering adding a flounce to an existing petticoat, the plan / to-make list is as follows:

  1. Removing the decorative gray trim from the bolero – done
  2. Opening the sides of the existing petticoat for pocket slits and to make the waist size more flexible – done, but not worth show and tell
  3. The bumpad – done, will post on it
  4. The quilted pocket – done, will post on it
  5. The ugly raisin quilted petticoat, a.k.a “son of the ugly puffer” – WIP
  6. The skirt – TBA
  7. The hat – TBA, blank arrived
  8. Victorian fingerless gloves (mine are all rather chunky knit/crochet) – WIP. First glove is ready to get it’s two seams (because I’m cheating)
  9. The spats – WIP. The base pattern is done. I can probably get away without them though the boots I plan to wear are fairly modern ankle boots. At least they are plain, have toe caps and a stacked heel.

Here’s the sad original plan, back when I thought I could get away with just making a skirt. I’d just sort of pinned the fabric up on the dummy. I’ll have to do a side by side comparison of the original plan vs. the complete costume once it’s all ready. The difference is huge.

Usually I make a big deal for Halloween. The house gets decked in its bi-yearly theme (witches) for one night. All the monsters come out, revolting amounts of candy are handed over and much coffee is consumed by dedicated parents. This year, however, the Rogues were sewing and doing a final fitting until 4pm. Here’s what we made.

image

A Victorian costume, complete with corset, walking skirt, apron over-skirt and tailcoat jacket. The majority of the costume is a heathered gray cotton of mid-weight with trim in blue poly satin and some matching blue braid.

image

The tailcoat is based on a tailcoat vest I made for a previous Halloween costume, which was based on a simple princess seamed vest pattern. The overskirt is a 1871 pattern from Truly Victorian, which we changed to be reversible (gray on the other side), the skirt is based on an 1895 skirt and includes period accurate pockets! They hang inside from one central point and are accessed by a slit in their center.

image

The piece you aren’t seeing is the under bust corset, which can be found here.

I’m pretty happy with the way the tails hang gracefully. The decision not to line them was a good one. I think they would have looked to heavy. The front of the coat will hang better without the overskirt beneath it.

The other part I’m particularly pleased with is the trim on the sleeve cuffs and apron hem. It’s the same gray as the general ensemble, pleated. I was initially going to put a strip of blue fabric over the seam of the cuffs, but happily found that nice blue trim.
image

This was a fast project and there were lesions learned about fitting, allowances that must be made for corsetry (we almost always steampunk and wear out unmentionables on the outside), equipment limitations, the squirelieness of satin, and timing.
image

In the future we would like to make some small adjustments to the apron to make it truly reversible, add some blue braid trim to it’s ruffle and probably make an alteration to the skirt.

And that’s not all. We also did some tailoring to the lady’s husband’s Victorian ensemble; adding pockets to his vest, hidden pockets to his tailcoat and Henning the pants. I’m sure they were quite a pair.

Next year there will be better planning and timing so people can have their costumes and I can have my usual Halloween fun. (Not that we didn’t have fun, it was just compressed.)

Here are the rushed, but final pics from the dual purpose corset, version one.

image

This corset was developed and made in a hurry to get our gal closer to the Victorian shape. The first project was a Victorian-esque costume. More details on that later. It reduces her waist by 4″.

The corset is made of heavy ticking fabric. That’s not ideal for a corset. As I’ve said before, there is no substitute for coutil. Since I didn’t have any white on-hand I had to substitute something heavy that would stretch as little as possible. Ticking does stretch, but less than denim and less than plain weave canvas.

Nope, not removing the orange markings. I said down and dirty and fast and I meant it. I can remove them after Halloween.

image

Above you can see some of the garment seams covered by bone tape, which is a flattened, heavy-duty, tube of fabric. About 1/8″ in on both sides is an indented channel, which is a sewing guide. There really is no substitute for this stuff either, at least not if you are making a sturdy garment that will shape the wearer. It encases the bones which are 1/4″ spring steel. The front opening uses 1/2″ spring steel bones.

The other thing you’ll notice is the black ribbon at the waist. This is called the waist tape. It is technically Petersham Ribbon. It’s a ribbed ribbon similar to grosgrain ribbon (but that is not a substitute). I’m not entirely sure, but I believe those ribs are woven, unlike grosgrain, which I believe is imprinted. Don’t quote me on that. The ribbon is not stitched down along its edges; it’s only attached where ever the bone tape crosses it. It serves as a floating anchor, taking some of the strain of the waist, which has the most tension. This is key since I had to use inferior fabric.

There is one bone on each side that does not completely cover it’s corresponding seam. This is unfortunate because that seam will fray where uncovered. However, the bone only needed to extend down part of the seam, so I didn’t waste the tape. Several of the other bones are in fact shorter than their casings.

image

Ideally I would have used a busk opening, but I didn’t have one the correct length. Busks make getting in and out of the corset much easier. Later corsets used some materials that had stretch (though they often used coutil in conjunction), which allowed them to use other openings like hook and eye.

What makes this more of a 1930s corset is the shape and length. It goes from natural waist to hips. It shapes, as corsets are meant to do and, the length – completely covering the hips and bum – also smooths, which will help achieve the 30s smooth and minimized bum silhouette.

Version two will be made of coutil and a bit of power net at the top of the thigh to aid in walking and sitting. It will also feature garters. Most importantly it will be front opening and back lacing. I plan to use button holes instead of the standard grommets (heavy duty ones are used, not the cute little ones you find in the usual fabric store). My theory is that the button holes and a flatter cording will give a less noticeable opening, which is ideal for the streamlined garments of the 1930s.

Related posts:
First look at the 1911 corset

image

Here’s the tailcoat in progress. The second sleeve has now been attached, and it’s hemmed. Everything is going well. I made a small for adjustment to the bust. Now I just need to match the shape of the facing to the new line and add the embellishments to the cuffs.

Should be complete Friday and I’ll will update with full costume shots.

image

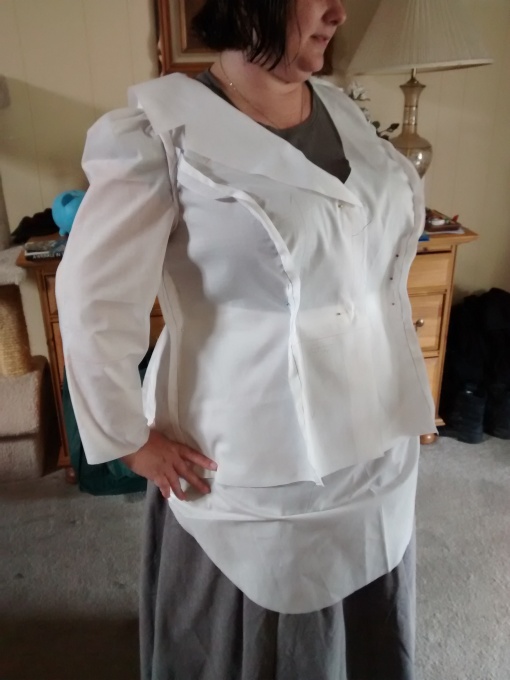
We’re working on a custom Victorian costume for Halloween. What you’re looking at above is the fitting for the jacket. You can also see the bottom of the apron-type overskirt and the skirt. What you’re not seeing is the final shape of the jacket, which will be a tailcoat.

image

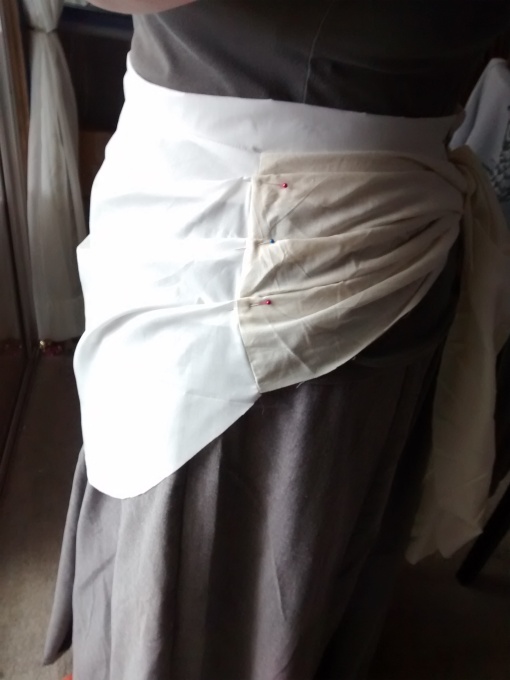
The apron overskirt has some pleats in the sides and basically a really wide tie in the back.

image

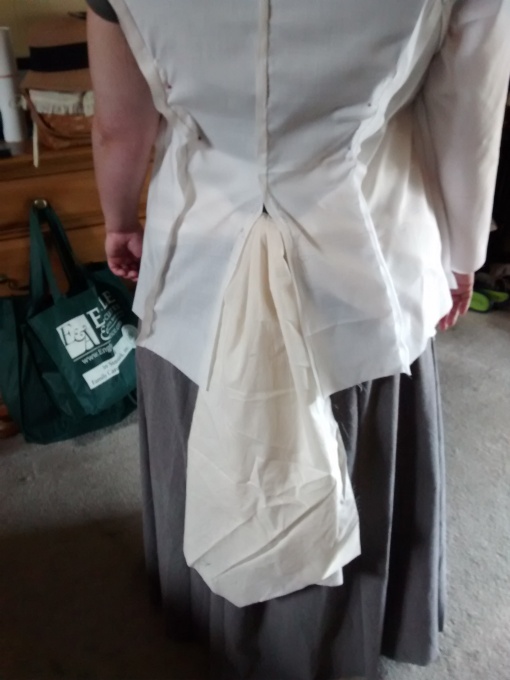
Here’s a bit of a bonus. I really didn’t know how the back of the corset was going to work, particularly with the tie on the overskirt acting like a bit of a bustle. Here’s what is going to happen. It’s going to divide the tails.

They’ve got links to some full books of historic costume. It’s nice to see these since I’ve been finding the Internet Archive less search friendly for cosigning resources lately.

Go, look!

I’m really excited about a Tumblr site I just discovered. It’s a great resource for Victorian, Edwardian, 1900s, 1910s and1920s original patterns. It’s called Real Historical Patterns.

image

I’ve only scrolled through about a year and a half of the archives so far, but there are a plethora of patterns, copied from various magazines of their day. Not only are there many, many women’s patterns to browse, but I saw a decent smattering of children’s and men’s patterns, with more men’s being promised soon.

The individual who runs the site has decided to find as many of these old patterns possible and present them for free, as many of them were originally published, instead of offering modern interpretations for sale. To this person I say “Huzzah! You make a historical seamstress so happy. And thank you.”

Enjoy everyone! Oh yes, they take submissions, so share the knowledge and send in a scan of that natty old coat pattern you found moldering away in grandma’s attic.

P.S. I’m making that tail coat jacket right now, rather, something very similar and slightly earlier. Photos soon.

20131026_090927It turns out that I live a few minutes from a fully restored 1890s Victorian Lighthouse, the Port San Luis Lighthouse. I had the pleasure to discover that when a friend asked if I’d like to help at a haunted house. I didn’t know where we were going or what I’d be doing. I just knew that I needed to be ready at 8am and (the night before she told me to) wear something Victorian.

The haunted house was a collaboration between the Lighthouse Keepers docent group and the Central Coast Paranormal Investigators. The CCPI did some ghost hunting in the weeks leading up to the haunted house and made their findings part of the tour experience. We had a cannibalistic fisherman’s family in residence with some gruesome victims – a girl chained to an old iron bed frame, a woman missing a limb in the basement, the White Lady, assorted ghouls and a couple zombies. And blood, lots of blood Each tour group included a plant who was attacked by the zombies. I think we got some genuine fright!

IMG_151720131026_112251_resized_2

Costume-wise it was more about gore, but I wore some pseudo-Victorian wear and trailed behind the groups to reset doors, etc. I basically recycled my New Orleans Halloween 2010 costume with the newer bolero jacket I made a couple of years later. The skirt was a thrifted a-line wool, which I added a black and white stripped flounce to, a matching black and white top, my green silk waist cincher, a (surprisingly matching gray poly) bolero with black and white striped piping, and my green false top “top hat”. The only thing I didn’t make was the thrifted part of the skirt.

If you have a chance to check out the lighthouse, at Halloween or any other time of the year, it’s worth the trip. Docent led tours are available on Wednesdays and Saturdays.

Link love and lighthouse history: