My husband is tough on his clothes. I can’t explain; I don’t know what he does. OK, I do know – he gets snagged by nails in attics, gouges himself on sheet metal and spends a lot of time crouching down. Being an electrician is particularly hard on one’s pants. He’s ripped the crotch on more pants than I care to count. That’s when he’s not ripping off a pocket, shredding the knees and hems, or just wearing out the butt. (That one I can’t explain).
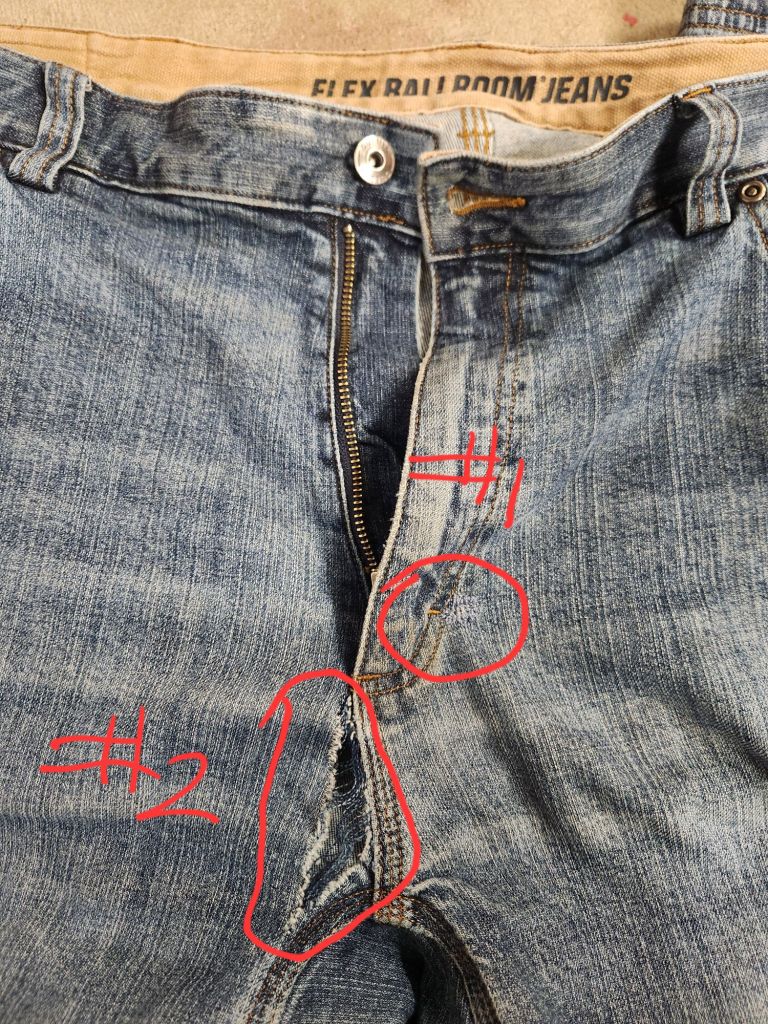
This particular pair of pants got a poke hole near the zip (#1, below, which is post repair), which I hand darned speedily and sloppily. It’s got a little piece of interfacing or some such behind it. The good news is it seems to have held up for another dozen washes so far.
And then he ripped the crotch on the other side, from the zip down, sort of shredding the fabric there (#2, below). I almost tossed the pants, but the fabric looked so good otherwise that I decided to patch the inside and darn over the whole thing on my machine. (Dreams of a professional darning machine; drools in sleep).
Materials used:
ripped jeans
old jeans to harvest some fabric
various semi-matching threads – a dark and a medium blue, in this case (husband does not care what repairs look like)
sewing machine with a narrow foot, so I could get as close to the fly as possible and a wider toe foot for zigzag / overcasting
Method:
Cut the sacrificial denim big enough that it can be tacked on well over the damaged area. Don’t go too big. We don’t want to create too much bulk.
Overcast the patch edges to prevent fraying.
Prep the damaged pants. In this case, I decided not to trim any of the frayed area. The hole was about 1″ by 2 1/2″ and all the yarns one direction were in tact. If the hole had been worse, I might have cut out the damaged part.
Pin patch in place from the outside.
Usually I’ll zigzag the fabric on to avoid having a hard stitch line that can create weak spots in the future, but I was stitching over the bottom of the crotch seam edge, which is several thicknesses; I just straight stitched.
Drop your feed dogs and either zigzag all over the frayed area, straying into the “healthy” fabric a bit, or do the same with straight stitch back and forth (and back and forth, and back and forth…). Essentially, you’re creating new fabric.
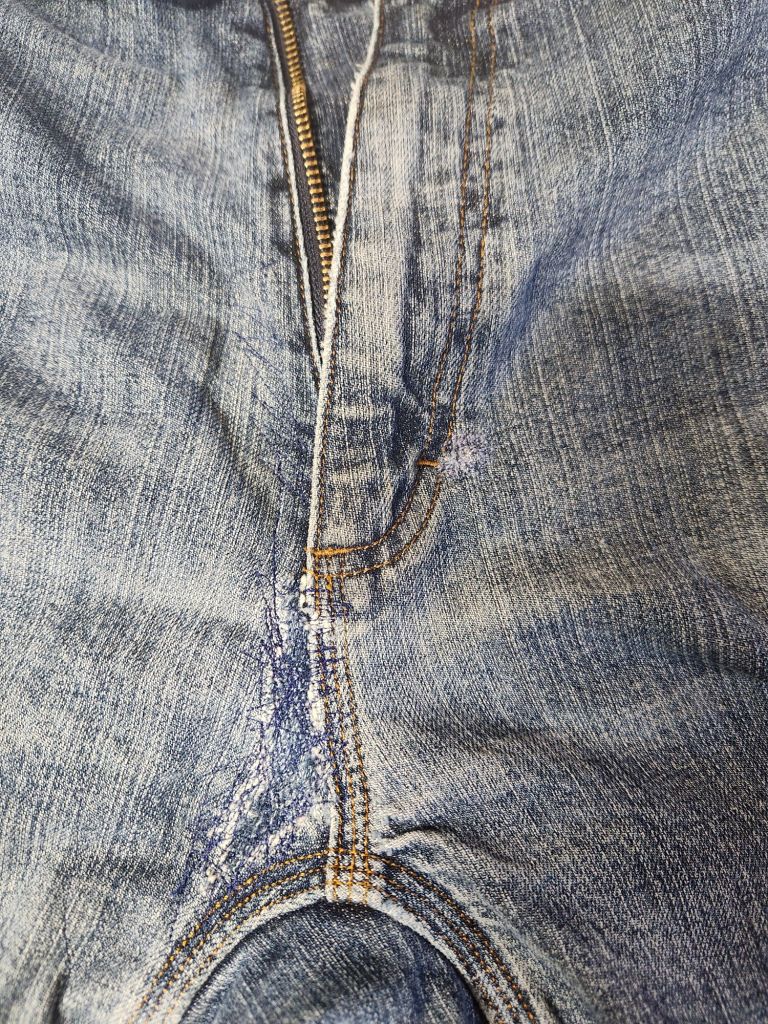
I was a little afraid that the rip would travel up from it’s present location, all along the edge of the zip, so I stitched up there, about 2″ above the bottom curve of the fly, a fair amount.
The result is not beautiful or invisible, but also not terribly obvious. They’ve been worn and washed a couple times and are holding up so far. Actually, he didn’t notice which pair had the repair, so good job me.
two annoying holes in otherwise sturdy jeansrepaired! well, if not prettily
Buckram Experiment 2023 part 3 (TBD April/May 2024)
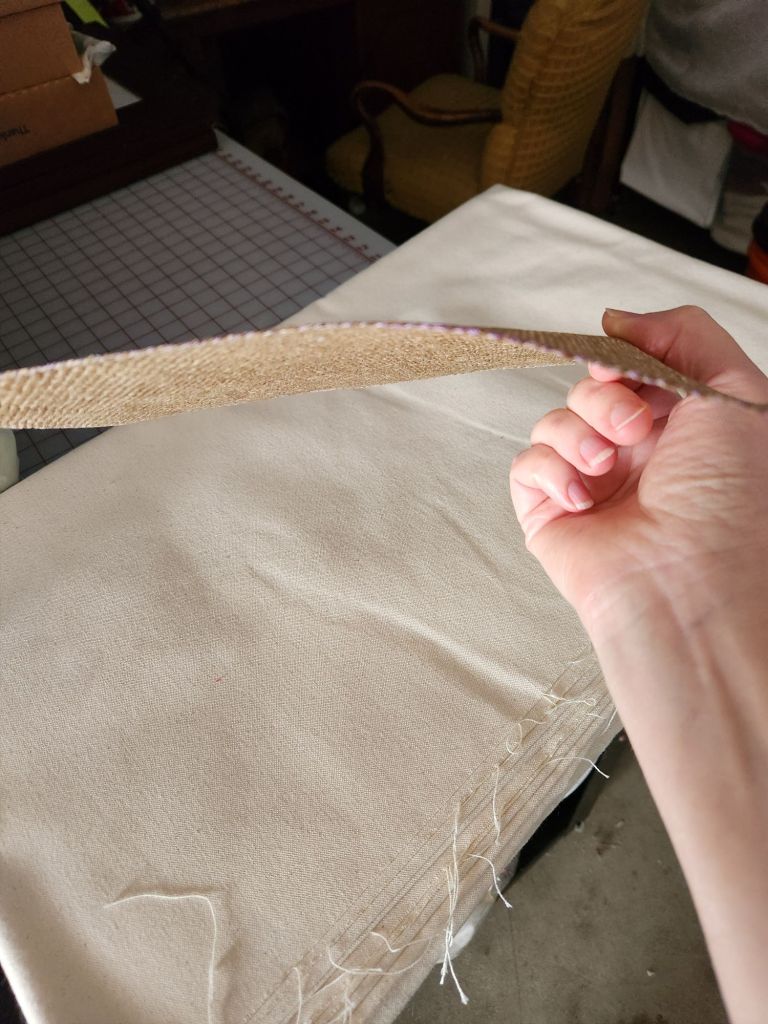
Gum Arabic and Hessian
My next step was to try both a stiffer fabric with bigger yarns and spaces between the yarns and a better stiffener. I cut a piece of Hessian (it’s burlap, but I bought it for an upholstery project and that’s what they call it) to size for my project and got to it.
I used a milk frother to mix up 6 tsp of Gum Arabic with 250ml of water. I would have used more, but that’s all my container would handle. It took maybe 30 minutes to get it all mixed in and for the resulting foam to subside.
Apply/squeegee/dry to damp/iron, repeat x4? x6? I don’t remember now. The result is stiffer than the Guar Gum, but not as much as I anticipated.
I’m not sure it looks stiffer than Guar Gum, but it feels that way.
Thoughts and Next Steps
While I do see the Gum Arabic as an improvement over the Guar, I’m not sold on it’s permanence when you factor in all the sweating I will do in this costume. Am I willing to risk all my work ending up in a limp and puckered finished garment? Nope.
Options:
buy some actual buckram (grumbles over price and availability)
try hide glue (still ewww, also there many of different types…)
try something synthetic (ah, research time!)
While I’m all for period authenticity, we do make many compromises and that’s okay. I don’t have the time or patience to sew everything by hand or to try to weave and dye my own fabric. My compromises may look different than yours. I’m moving on to a synthetic stiffener.
I started researching what stiffener is used in buckram now (it’s a PVA glue). I’ve found one at a bookbinding supply site that I’m pretty excited about. I do need to wait to buy it until there are no more freezes. Apparently, if it freezes during shipping, it’s useless.
My costume time is getting tight and I’d like to get on with it already! But for now, I’m hoping to buy the glue mid-April. “The Buckram Experiment 2023 part 3” post will follow.
Updates on other projects
I have a kirtle bodice mock up, as well as one for the partlet. I’m going more historical (lower middle class) and realized that the most appropriate similar costume is the same structure (not detail) as Trossfrau. With that in mind, the partlet will be a gollar.
the mini pavilion has a new structure (a bare popup), but the canvas from last year should still work. Waiting for the weather to clear up.
The graphic for the tabard has been redrawn to work as a stencil.
The guild pavilion has been re-planned and I’m waiting for some measurements so I can buy supplies.
It’s been a few years since I last posted, which, you might notice, roughly coincides with the recent COVID pandemic. During that time I was completely burned out on costume. About the only things I’ve sewn since late 2019 have been mending projects. I needed an escape, but instead pretty much spent my days going to work, as usual, avoiding the presence of my coworkers at the same time, and doom scrolling! Such was the life of many an essential industry worker.
Some people took their enforced confinement time to work on costumes, but I started to hate them (costumes, that is). I didn’t see a point for myself. That said, I did still enjoy watching what others were doing and now can better appreciate all the time and enthusiasm they poured into their projects.
This year I’ve had the great fortune to spend time with my renaissance guild, both in and outside of faire. Somehow I seem to have gotten my costume mojo back. I’ve been researching for a couple different, related, projects. I also completed a nominally period-ish looking tent coverup for one of those screen houses (and repairs to the screen house itself). Now that I know the structure can take the canvas weight, I plan to redo it in a way that will make set up and tear down easier, not to mention make looking a bit more period. But more on that later.
This year, I’ve tentative plans for:
the above mentioned mini pavilion revamp
a revamp of our main guild pavilion – it’s shrunk and my method of attaching the walls and roof, while secure, make it tedious to put up
two Elizabethan tall hats
detailed instructions for someone else to make an Elizabethan tall hat (done)
a new lower to lower-middle class costume for myself, likely including: a supportive kirtle, gown, partlet, new smock. I do have a good smock and existing sleeves, so those may or may not happen
helping a couple other people with their new kirtles/gowns
helping some guildies with other costume upgrades
a tabard for our new guild herald, possibly a couple more
possibly a new Dickens costume??? I don’t know
finishing a long running, oft put down, crochet project and, as a reward, starting probably one of the most ambitious crochet projects I’ve ever considered. Which will undoubtedly take me years, the way I tend to get distracted…
I think I’m back for Halloween too and my current plans involve at least one big prop build
Now to the meat of this post!
As I was helping a friend source materials for making an Elizabethan tall hat, I discovered that buckram is even harder to come by than it used to be. There is one source that makes their own period stuff and they mentioned that it can be made with hide glue (eww, but maybe). Additionally, it can be made with tragacanth or xanthan gum, the latter of which was actually discovered in the 1960s, but really, I don’t care. I also have it on hand, so…
EXPERIMENT TIME!
Goal: To make my own buckram, essentially on demand
My Theory: That either the roughest weave or the double fill will be the stiffest, given the same application of gel to all fabrics.
Items Needed: hot water, xantham gum powder, a measuring spoon, measuring cup, mixing container with lid, natural bristle brush, cutting board or other surface that won’t transfer color to fabric and fabric samples. Fabric note: a rougher weave is suggested.
Fabrics I Used:
a fairly heavy mystery “linen” donation fabric that is a double fill, in a natural color. I’m guessing it’s in the 6.5oz range
a dark blue linen at 5.3 oz
a dark rust color linen that is likely 7.3 oz and seems a little rougher weave
a dark brown linen that is 7.1 oz
a no. 12 cotton duck (11.5oz fabric with a double fill) in natural
an 8oz cotton painter’s drop cloth
Prep:
Cut two samples of each fabric, one to test and one as a control. Originally I was only going to use only the first four, but added the others on the second day.
Mix together a half teaspoon xanthan gum with a half cup of hot water. Mix like crazy to avoid lumps, or be lazy like me and use one of those little hand held milk frothers. Incidentally, the instructions said to use a cup of hot water. Not sure why I used a half cup. I don’t expect leftovers to last in the fridge for more than a couple days since I used tap water, which contains living organisms.
General Procedure:
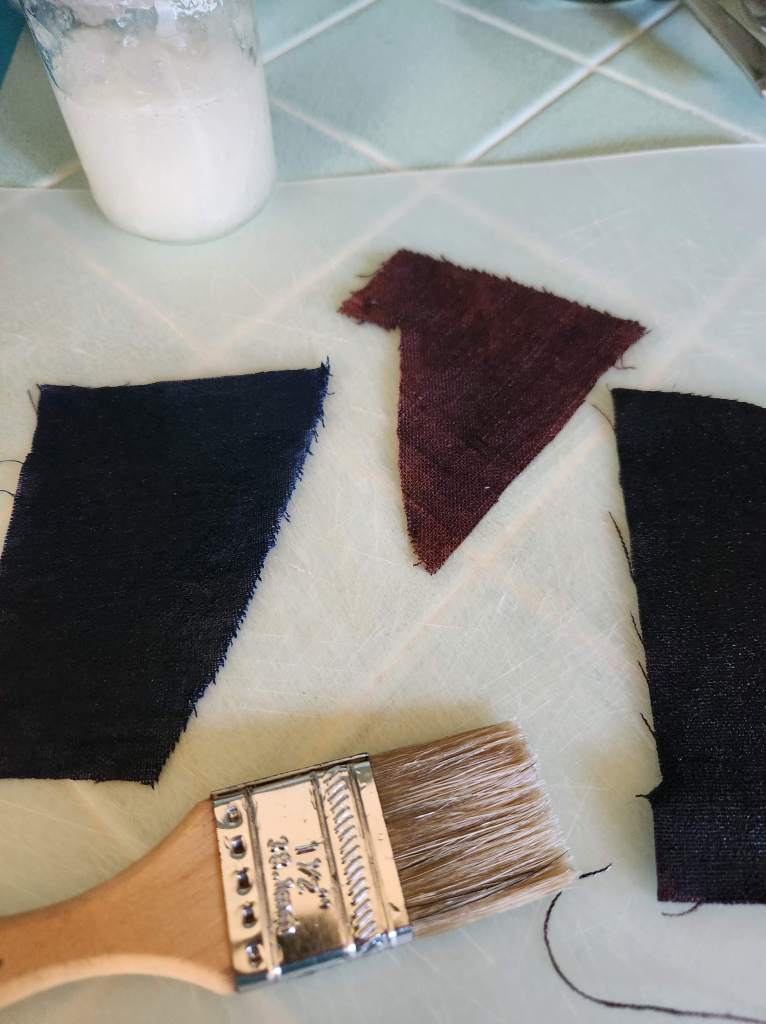
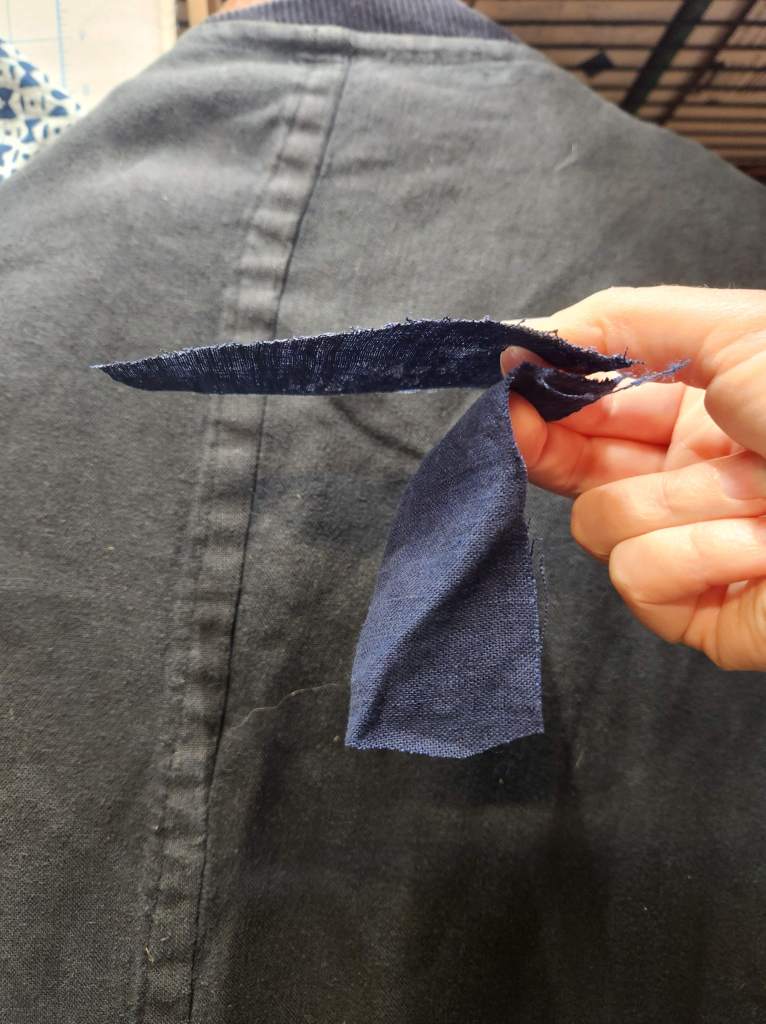
left to right: the blue, rust and brown fabrics
On a waterproof surface (the cutting board, in this case), apply the mix with your brush to one side, working it into the weave with the bristles.
Once dry, repeat process on the second side.
Repeat to make stiffer.
What I did:
After my initial application [to only the first 4 listed fabrics] I put my samples out in the late afternoon sun to dry. After an hour they were all dry. They were probably dry sooner but I didn’t check earlier since I had a cat on my lap. Interestingly, the double fill fabric curled up a bit at the edges. The others all stayed flat. Each of the fabrics definitely had increased stiffness. I applied a coat to the second side only, again working in a bit. I do you feel like I used a little bit more gel this time. I put them back outside to dry.
An hour later the fabrics weren’t quite dry. I could still see some moisture in the middle areas, particularly on the one that seems the thinnest (the blue), but it was stuck down to the plastic cutting board pretty thoroughly. When I lay them out during the initial round, I had pulled them off the cutting board so they weren’t completely stuck but, as I said, I think I used more a mixture on them in application two.
After another hour they were dry. They were stiffer, but not anything like the commercial heavy buckram I have. That has a loser weave with thicker yarns. I decided to continue the project to the next day because it was getting later and cooler.
The next morning, I applied a gloppy layer to the samples and, once again, tried to work it into the fabric with the brush bristles. Additionally, I got the two samples of cotton canvas. I dipped both of those so both sides were completely coated and worked the mixture into the fibers with my fingers, then wiped off the excess. They all went out into the morning sun to dry.
Side note. The reason you don’t just dunk the fabric in the gel squeeze out the excess is because you risk wrinkling the fabric. I can see it working if you use a squeegee to remove the excess instead.
An hour later, the original brushed samples were dry. I brushed a coat on to second side. The dunked samples were still damp.
An hour later, the original samples were dry and complete for this test. Of the two cotton samples, the heavier double fill was dry, but the lighter weight looser weave was slightly damp. I coated the first side of both of them for a second time with the brush.
Another hour later, and the two cotton samples were dry. It was warmer today, probably about 75°, and there was a little wind. I coated the other side of the two cotton samples one last time.
An hour later, all my samples were dry. The double fill had continued to curl a bit. I’m now questioning if it’s linen or not. It was a donation. A burn test will at least ensure it’s natural fibers. [Not done yet].
Evaluation
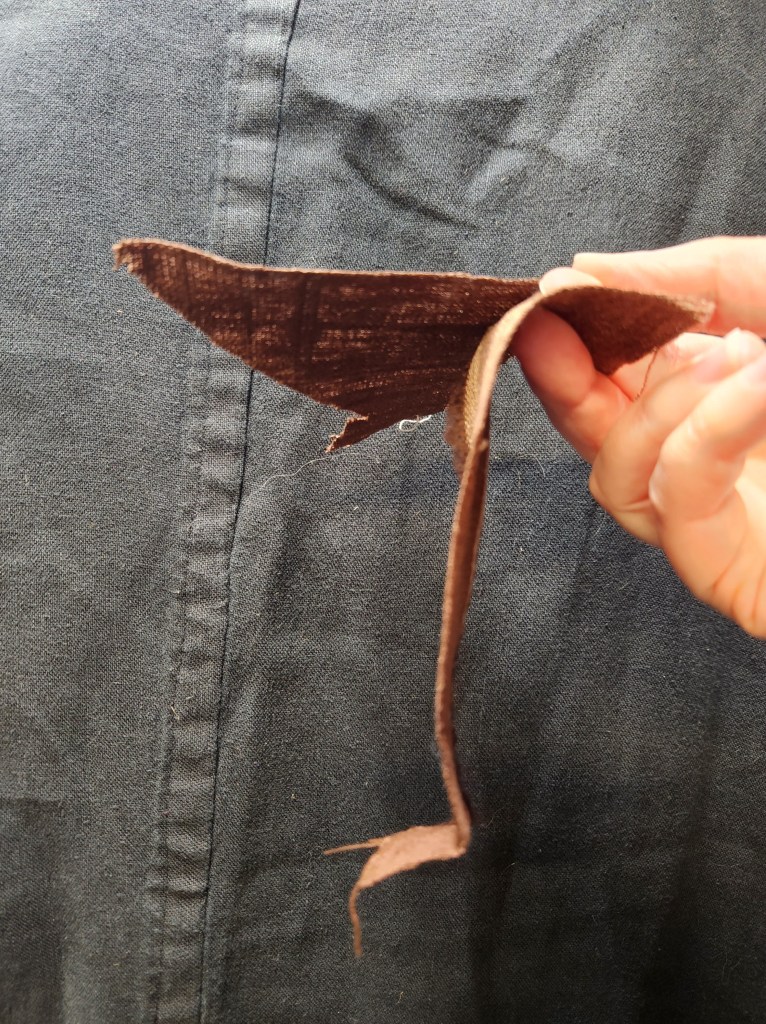
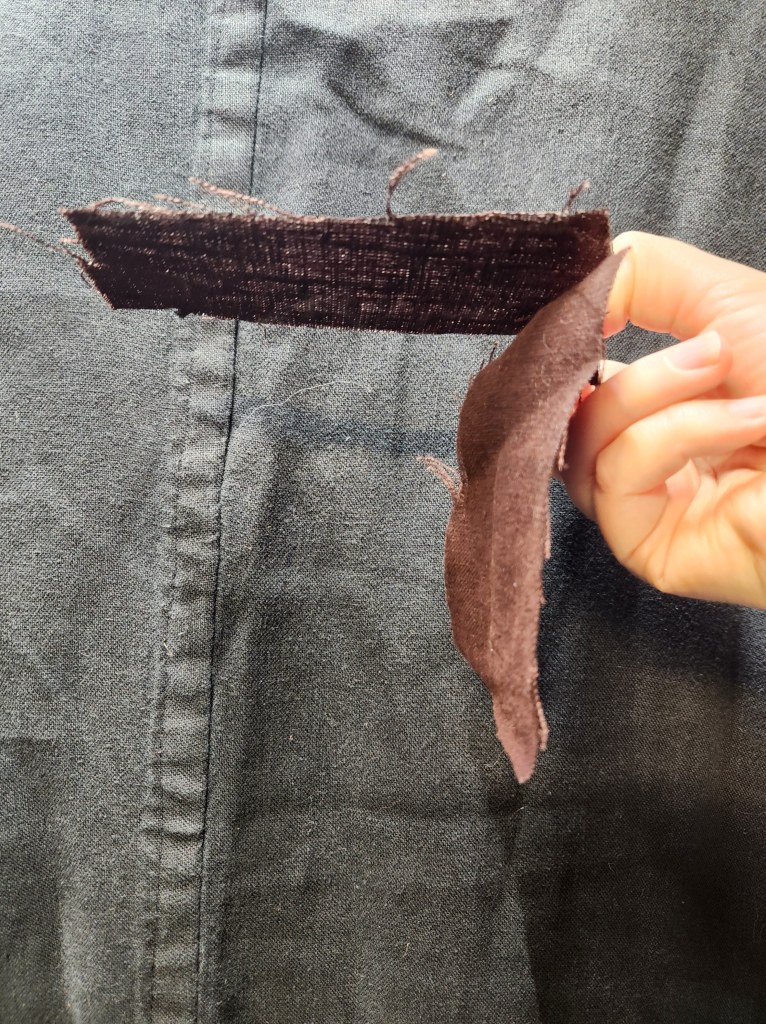
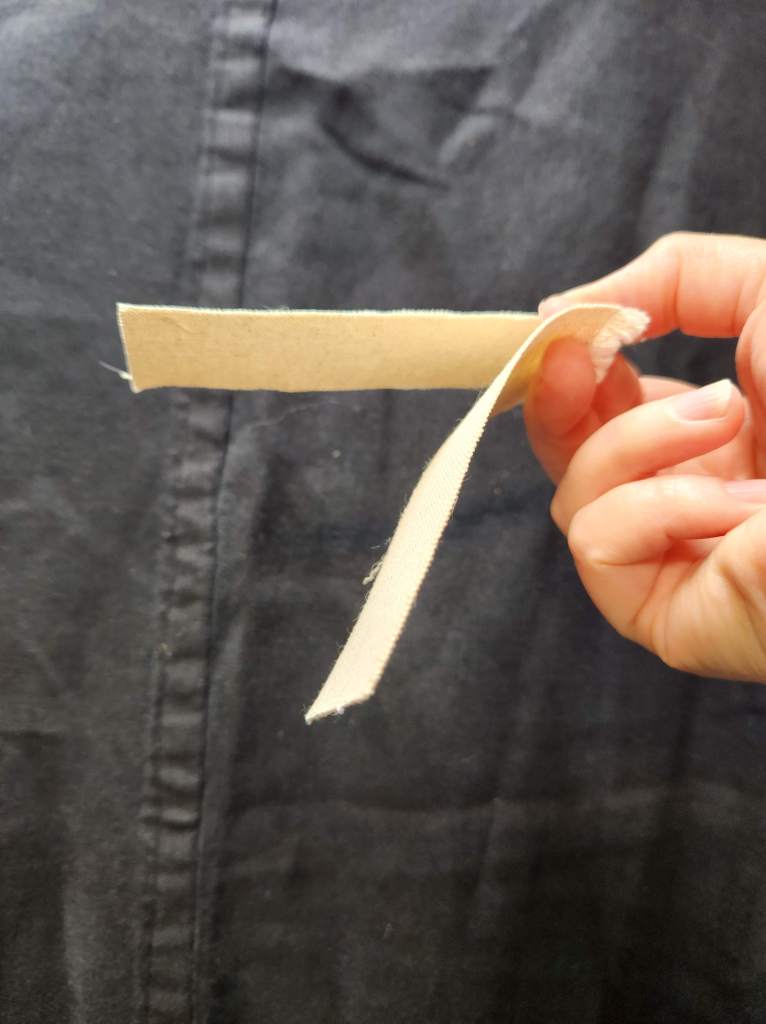
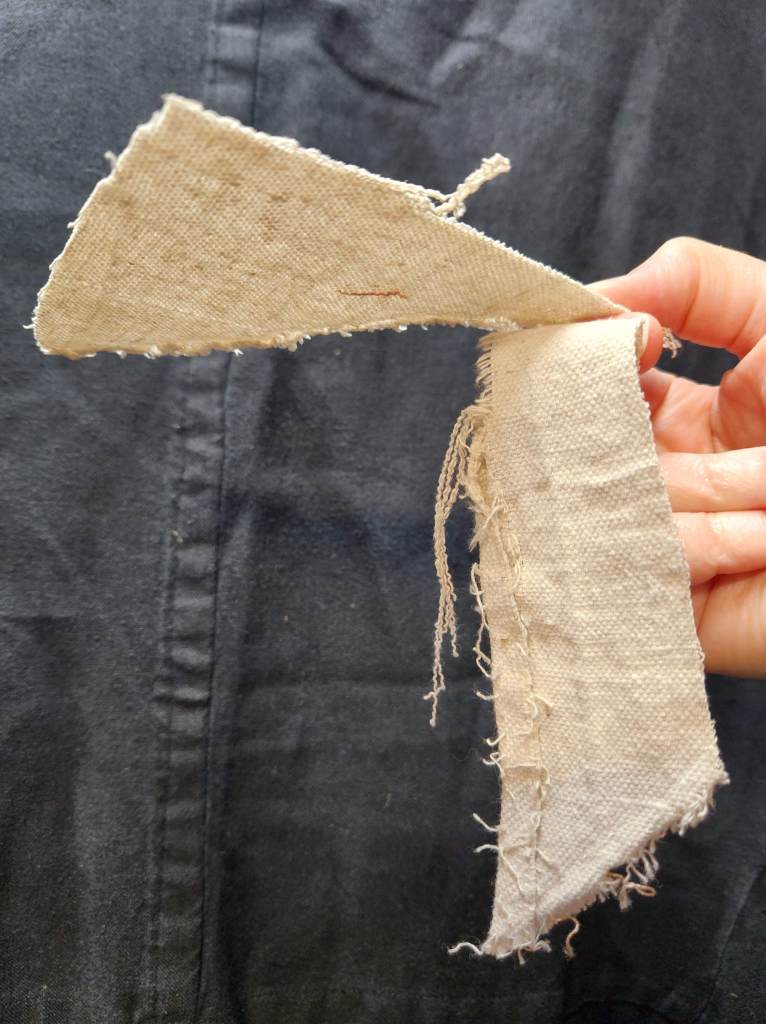
I’ve taken photos of the before and after, holding each of them on their edges or points in a way so you can see how much or little they drape, for both the untreated and test pieces. I’m also holding them so you can see how much light passes through the weave of the stiffened version.
double fill donation “linen”blue 5.3 ozrust 7.3 ozbrown 7.1 ozno, 12 cotton duck8 oz painter’s drop cloth
Don’t be fooled by the drop cloth. My angle is different; it’s actually drooping.
The duck is a big question really, it’s already stiffer because it’s a tight double fill. I’ve used it as an interlining before, but also made a pavilion out of it. Treated it feels rather soft. I wonder if that means it could handle more stiffening gel?
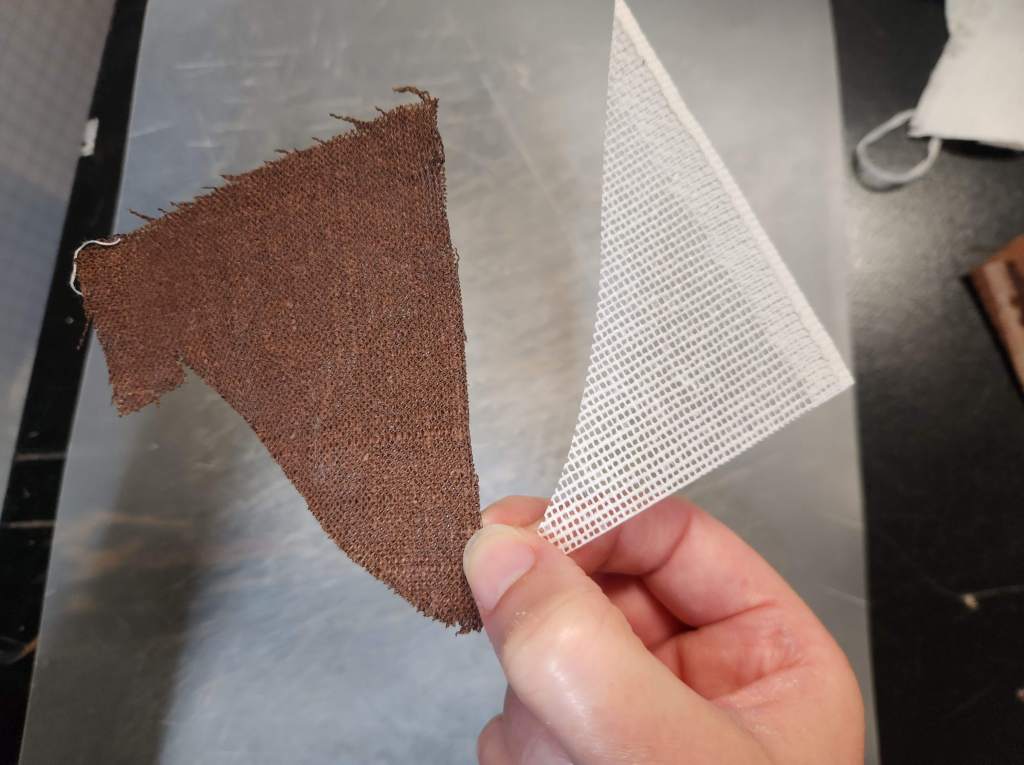
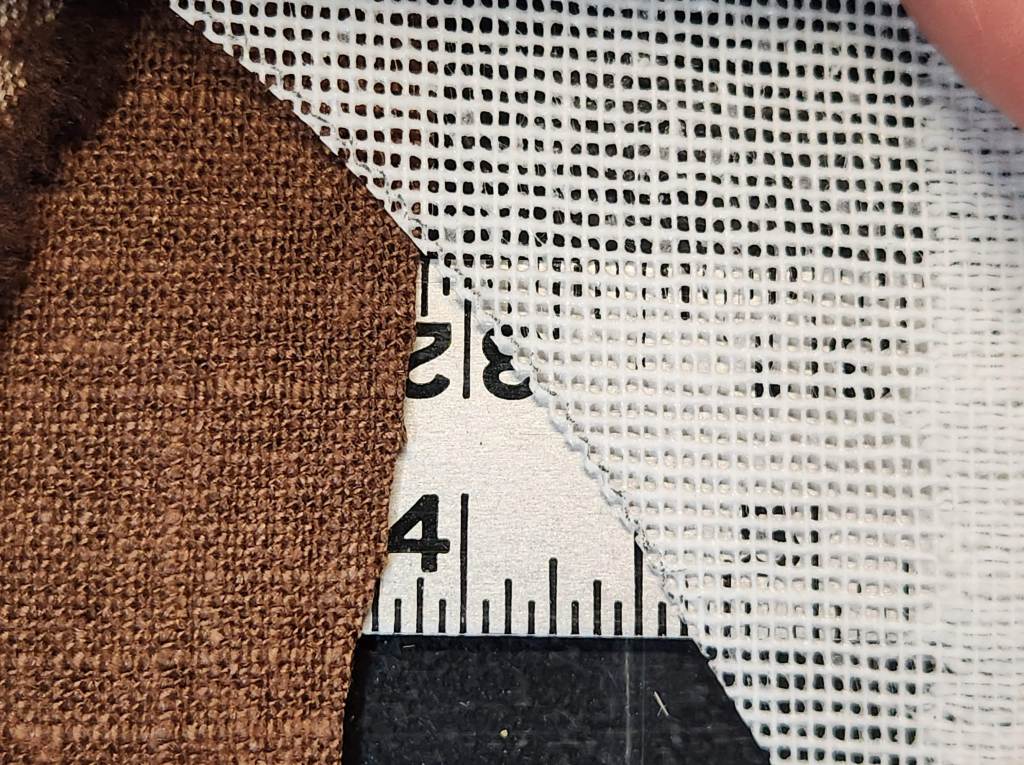
The one that feels the sturdiest to me is the rust, I believe 7.3 oz. It is a rougher weave or at least the roughest I have. I’ve also compared it to the commercial heavy buckram I have and you can see that there’s a great difference. You can see whatever it’s stiffener is in the weave gaps. I don’t know what the commercial stuff is stiffened with, but the substrate should be cotton.
Holding both by the point the brown is only bending a littleThere really is a huge difference in the weave
The blue, which is a tad see through, is also rather stiff. It could have some uses.
The overall difference in stiffness appears to have more to do with the structure of the weave, then the thickness of the yarns, than it does the given ounces or perceived weight of the samples.
Next Steps
I would like to get something with a looser weave with a heavier yarn size and try this again. I can definitely see the potential use in making my own buckram. I know of one source that carries a loose “open” weave linen, though it’s only 5 oz, so the yarns are smaller than the commercial heavy buckram. I would also consider trying hide glue.
The big question currently is: is any of what I made acceptable for stiffening my Elizabethan kirtle? If I’m going by the standards of modern heavy buckram the answer is no. But is that the appropriate standard?
_______________________________________________
Edit the next day: Additional Thoughts
I’ve got at least one other substrate idea to try out. And then there’s the stiffener. I said, “why not?” when I realized I had xanthan gum on hand, but now I have some specific negatives to research. Here is a quote from Reddit user “Reep1611” from this thread (bold added for emphasis):
“…Xanthan while also being a polysaccharide acts different [than tragacanth or arabic gums]. Where Gum Tragacanth and Arabic when dissolved in water thicken it to a moderate degree and create a quiet sticky liquid with a not too small amount of them being dissolved, Xanthan is an extremely effective thickening agent. That means there is a lot less dissolved into the water, and such a lot less of it in the buckram. It also is not too sticky. That means that it’s capability to stiffen is a lot lower. Add in that it tends to dry somewhat powedery and brittle and the buckram is softer, needs more treatments, has somewhat different properties and a tendency to loose it’s stiffness when worn and put under stress. And because Xanthan dissolves into a gloopy mass, and not like a thin syrup, it also has a much harder time penetrating the weave and in between the fibres. Which also makes it more fragile. Then we come to another point. Both Gum Tragacanth and Arabic have strong antibacterial and fungal properties. Even if it’s a bit more moist, they don’t really do anything. But Xanthan, due to being extremely hydrophilic, loves to suck moisture from the air. The trouble is that it is a pure polysaccharide, basically a long complex sugar with none of the additional substances in the natural gums. So there is nothing stopping bacteria and fungi from eating it. I actually had mould grow on some of my Xanthan buckram after a particularly moist and rainy week.“
So…. experiment TBC… Runs off to do more research and find Gum Arabic.
The table it’s sitting on is a 4′ x 4′ square and you can see it overhangs.
My camera decided to make everything very yellow, so I had to tweak all the pics, which blew out the backgrounds. This yarn is a vibrant blue-teal in real life, technically Peacock.
I used the Red Heart With Love yarn instead of the Super Saver the pattern calls for. The With Love yarns are delightfully soft. I’m pretty sure it also altered my scale so I might have an overall slightly larger blanket. The pattern calls for 6 skeins @ 364y each, but the With Love has 315y. I believe I bought 8, but I can’t be sure anymore. I got all worried last year, when did the bulk of the work, that I wasn’t going to have enough, so I bought a lot of three skeins in a panic. I can tell that I have those three new and one original left over. Thankfully I love this color.
The pattern is listed as intermediate and I’d agree with that. It’s not really a pattern you can work while watching TV, since every round is different and there are different size clusters in different places in each round. That said, once you get the swing of things you do make the same thing 12 times.
I initially started this with some leftover yellow yarn from the Monster Slippers, as a test run. Making one (some errors included) wasn’t too bad. I think I got through my first peacock square without too many mishaps, but it took forever somehow and it was clear that I would not be finishing for Christmas. I also felt like it was a bit too complicated for my skill level. My next big project was a Virus Blanket, which was easier than the pineapples, but more complicated than other things I’d done. It was a good way to prep myself to get through this blanket.
Being a South paw crocheter has some special challenges. It’s not just a mirror image of normal instructions. Things don’t always work in reverse. There are a couple very simple edge stitches that I can’t even do. In the round it means you sometimes need to start in a slightly different place than instructed, like at the next stitch or motif over. It’s entirely possible that I missed something somewhere and if I made this pattern again I could start my rounds as instructed (even though I’ve made 13 if these squares…), but I find the need to start elsewhere pretty consistent over different in-the-round patterns.
What all this means is I have to rewrite the instructions. In this case I did so more than once (the first year and the second). These aren’t really written for anyone else and don’t say things like where I start subsequent rounds, but it gives you an idea of what I need to do to get through a pattern. What I love are diagrams. If a pattern has one I hardly need to make any notes at all, just find my starting place.
Left to right: my notes on the original, half of my version 1 and both pages of version 2, with a diagram of the first 8 rounds.
Did I enjoy this project? Yes.
Would I make it again? Maybe, but not any time soon. I really don’t like to do the same thing over again. I prefer a challenge. I did actually make something else with pineapples last year, a shawl, so that was similar.
Would I change anything if I did make it again? Yes. I think I’d add another row of squares so it would be 4 x 4 instead of 3 x 4. That should be around 64″ x 64″ overall.
What did I dislike most? I hate sewing in ends and sewing together. That’s why I will probably never make anything with Granny squares. I think 12 squares is my minimum. That said, if I made this again, I might figure out how to crochet the squares together as I went instead of sewing them together at the end.
No, it hasn’t been blocked and I frankly don’t care.
Look at those pretty pineapples! (A thing I would never say if it was food!)
This is the fill in motif. You start with a magic ring, add clusters, then complete by crocheting the little motif into the available space.
This is the center of a four pineapple square. Looking at it now, it doesn’t look quite symmetrical. I might have goofed something up. I know there are a couple places where I have a 3dc cluster where a 4dc cluster should be and visa versa, but I didn’t notice any central motif errors while I was making them. C’est la vie!
All folded up and ready to give to my mom for Christmas!
Quick make up and setting spray test for Halloween.
Black nails with matte top coat
Black mehron Paradise makeup
NYX matte finishing spray
Yes, it will be on my fingers and probably half way up my hands. We’ll see. So far the setting spray is definitely matte and not tacky now that it’s dry, except that I can feel there is something on my hand when I bend my fingers. Casually running my other hand over the made up area there is minimal to no transfer! Sweet.
Did you know they make matte top coat? New one on me.
I’ve seen people do some cool things with blackened fingers, but my version will be slap-dash, applied hurriedly between putting out all my lights and candy and the hordes of little monsters showing up demanding their due.
Creepy school girl a la Sabrina. Better keep my fingers off that white collar, just in case.
I love inventive crochet and knitting. By now we’ve all seen the kids’ stocking cap with attached lumberjack beard and the very cool crocheted Viking helmets. Love them.
This mom has been tackling Halloween via crochet. First she made a full suit crochet Predator costume, which was great! As a child of the 80s her other creation holds a special place in my heart – and yeah, of course he glows! Check out Slimer!
It sort of reminds me of the inchworm costume I insisted my mom make me when I was about 5 (only cooler, sorry Mom). I’d totally be Slimer for Halloween.
Here is a vintage Kenmore buttonhole attachment I received recently, complete with original case, instruction book and metal templates. Also included were some extra templates in their own case and a second instruction book.
In the case, left to right, the plate that covers your feed dogs if you don’t have a lever to drop them, templates, a thumb screw (above the snap) and the buttonholer itself
I haven’t tried my new attachment yet, but I’m pretty excited about it. It appears to be the one that was intended for my Kenmore 1752, which is my everyday machine.
The unit and case are in quite nice shape, showing only usual wear. It has 9 templates total (one is in the unit). Sizes range from 3/8″ to 15/16″ and come in straight and “keyhole” patterns. It is possible to create holes longer than 15/16″ by stopping the stitching before it creates the end keyhole or bar and moving your fabric, but that does take practice. My Griest version also has an eyelet template.
I much prefer the keyhole templates, which leave more room for the shank of the button to sit in. Instead of creating a bar at the far end during stitching, the threads continue around in a curved keyhole shape. Overall, the nicest thing about these old attachments is that they leave a little more space between the side stitches of the hole and you are less likely to slice through some of threads when opening the hole.
There are several types of buttonholer attachment: for low shank, slant, straight stitch, zigzag stitch and presumably for high shank as well. The height of the shank and straight/zigzag are independent elements, so that makes for quite a few options. It’s also worth noting that some brands fit multiple brand machines. Griest and Singer fit Kenmores and probably other machines as well. I believe I use a Type 1 on my Kenmore 1752 and numbered types go through at least 5.
Using these attachments does take some practice and it does take a little longer to make each hole, but the results are stronger and far more attractive buttonholes when compared with modern versions.
As someone who loves history and participates in historical reenactment it’s a little disappointing to see many historical images. They feel drained of color, lessened, like they aren’t quite real. (Do people with color blindness feel the same way?)
I’ve seen a fair number of well colorized photos in recent years. That colorization does a lot to make the images feel more present, realistic and relatable. It brings them to life even more than black and white moving images.
Now that I’ve seen the colorized images of Mario Unger on Instagram (via BoingBoing) I’m not sure how I thought the others were so good. His images are simply stunning and full of life. I love seeing Billy Holiday mid performance, as if I was right there. There’s Ford, a group of Romani, turn off the century street scenes and Civil War soldiers, Freud, Che and a very young Frida Kahlo. And the image of this young woman, which I find particularly compelling:
These are mostly just funny thanks to proportion, styling and/or fabric choices. Enjoy!
Looks like an 80s pattern, but it’s from the late 70s. I just don’t get the drawstring at hip level, let alone 2 of them on the red one. Can you imagine how it would look if it rode up?
Hello 70s! Double knit polyester! Front zip jumpsuit! Bonus gold boots! Stylish!
Here’s a 70s version of a Little House on the Prairie top. Not that I couldn’t use it to make a shirt for Renaissance Faire.
This one is deeply boring. I have two copies! Someone wrote on the other one that it was 4 inches too large. What does that say about standard ease at the time? Sheesh.
This one is sort of ethnic. Reminds me of a Folkware Pattern. Looks horrible in red and really the pleating at the stomach is not very flattering, especially as a top.
Look at the length of their legs! Silly. The floral choice is terrible.
Honestly this one makes me smile. Not that I’d wear it or anything! These pants are the basis for the 30s Beach Pajamas, however.
Say hello to a Cathleen Turner look alike in clothes that don’t fit at all. How does that shirt stay in place and not end up sliding off her shoulder? How much fabric is in those pants? And let’s not forget big hair.
The only good thing I have to say is that I could see this as the basis for an early teens dress. Note Robin bow at the waist. How sweet.
It does have pockets going for it.
Again, this could be used as the basis for some previous era garment. The way it is, however, it looks childish. That collar!
Speaking of childish… But it’s sorta cute as a romper. I hate rompers.
This is just one of several Little House on the Prarie-esque patterns I have. High necks, pouf sleeves and ruffles! Others remind me of Dynasty. Funny thing though, I think I can use that square bodice front for the 30s Beach Pajamas I’m working on.
This one is just sad and shapeless. I didn’t know they were making house dresses for younger women in the 80s. Looks half way OK with a belt. And there’s that hair again.
Here’s a bonus bad early 90s pattern. It’s just boring and shameless. The funny thing is that I somehow have 4 copies. And they came from two sources. I also have at least 5 other ones that are basically identical.