The 1920s are known for their idealized flapper girl, with her boyish figure. The waist had all but disappeared or appeared dropped from it’s proper anatomical location, making the hips seem slimmer, and busts were minimized. By the 1930s the waist was reemerging, lines were more graceful, curvier and the overall clothing more elegant and lady-like. The waist was back, but the figure was still very smooth and idealized. So what is a girl to do with her curves? This isn’t the Victorian era. Corsets weren’t employed by the general populace to completely rearrange the figure, but it did need it’s “unlovely” bulges smoothed out.
 You’d be surprised what was considered unlovely bulge. According to one ad, the curve at the small of ones back was unsightly. It was referred to as “Lordosis Backline.” Wikipedia says that Lordosis is the normal inward lordotic curvature of the lumbar and cervical regions of the spine, but an excessive curve is commonly known as a sway back. I don’t know if the phrase “Lordosis Backline” was commonplace or a marketing ploy used to exploit a real condition, but more women than not, wore their foundations 14 – 16 hours a day.
Another ad has a little girl asking her mother if she will “stick out” like her when she’s older, with dad looking on, snickering. How, pray tell, do you get rid of that curve, that “figure fault”? By smoothing out the backside! Look at images of Hollywood starlets in their 1930s evening gowns and you will notice that the bum was not at all prominent. In fact it’s lack was a little boyish. Restricting undergarments went all the way down over the bum or to the thighs.
Take a look at these before and after images of a woman who had pretty minor “figure problems”:

This is the beginning of the switch from corsets to girdles and the era saw a surge in pre-made garments and professional made-to-measure items. Inevitably there were some holdovers to the tried and true corset and others may have desired more “smoothing” (more here meaning corseting, compression), hence the variety.
The biggest factor in going from corset to girdle must have been the wider range of fabrics available. Corsets of the previous centuries could only constrict. In fact there is a fabric made specifically for corsets. It’s woven in such a way that it has almost zero stretch. It’s called coutil and is traditionally a very tightly woven herringbone (there is a more modern satin as well). Real, good quality corsets, even today, are made with coutil. Period. There can be a fashion fabric outer layer and a lining, but if the main material isn’t coutil (and spring or spiral steel bones, but that’s a different conversation), it won’t last and the shape it gives you won’t stay true. With the advent of man made fabrics girdles could be made that smoothed and gently compressed, but allowed the wearer more range of movement. Some garments were constructed mostly of coutil with some stretch (possibly elastic or the period equivalent of power-mesh) added in gussets across the thigh and sometimes as a top band. I think of these as transition garments and this is what I will be making for this 1930s project.
If you do a search for “1930s corset” you aren’t going to get many hits. Search “1930s girdle” and you’ll get some. Search for a specific company’s garments and you’ll get a lot more info. Try “1930s Spencer” and you start to get somewhere. Better yet, visit Corsetiere.net and you’ll get a plethora of information on various companies’ garments through their history (through today in a couple special cases!).
Not finding an period corset patterns, but finding many ads for corset makers of the times, tells me that corset making as a home art was largely dead or dying by the 1930s. There are some patterns for period girdles, but I’m not looking for stretch in this case, nor was every woman at that time. There is nothing that says I can’t make my own 1930s corset, so I will.
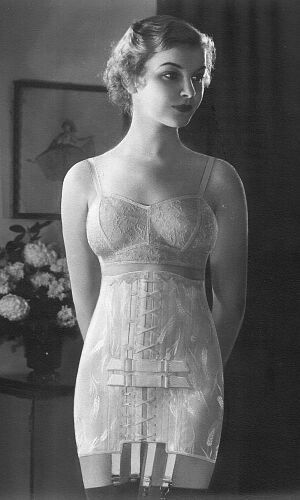
As for the shape of the 1930s foundation garment, whether it’s a corset or girdle, it hadn’t changed much from the early century. It was long at the thigh and came to some height between directly under the bust and the waist. The single bra+corset/girdle garments are not something I want to try as a first shot and some are actually a long line bra over a corset/girdle.
What I’ve found are several patterns or variations on a couple patterns from about 1911-12 that I plan to test as is, then modify. One has 5 panels per side and will be my basic model. Another has a couple shaped gussets included. While I like the latter’s shape, the pattern doesn’t lend itself to enlargement as easily as the other. My plan is to make the 1911 and figure out the gusset placement, modified for power mesh or the like, after.
See related posts:


