A denim repair story.

My husband is tough on his clothes. I can’t explain; I don’t know what he does. OK, I do know – he gets snagged by nails in attics, gouges himself on sheet metal and spends a lot of time crouching down. Being an electrician is particularly hard on one’s pants. He’s ripped the crotch on more pants than I care to count. That’s when he’s not ripping off a pocket, shredding the knees and hems, or just wearing out the butt. (That one I can’t explain).

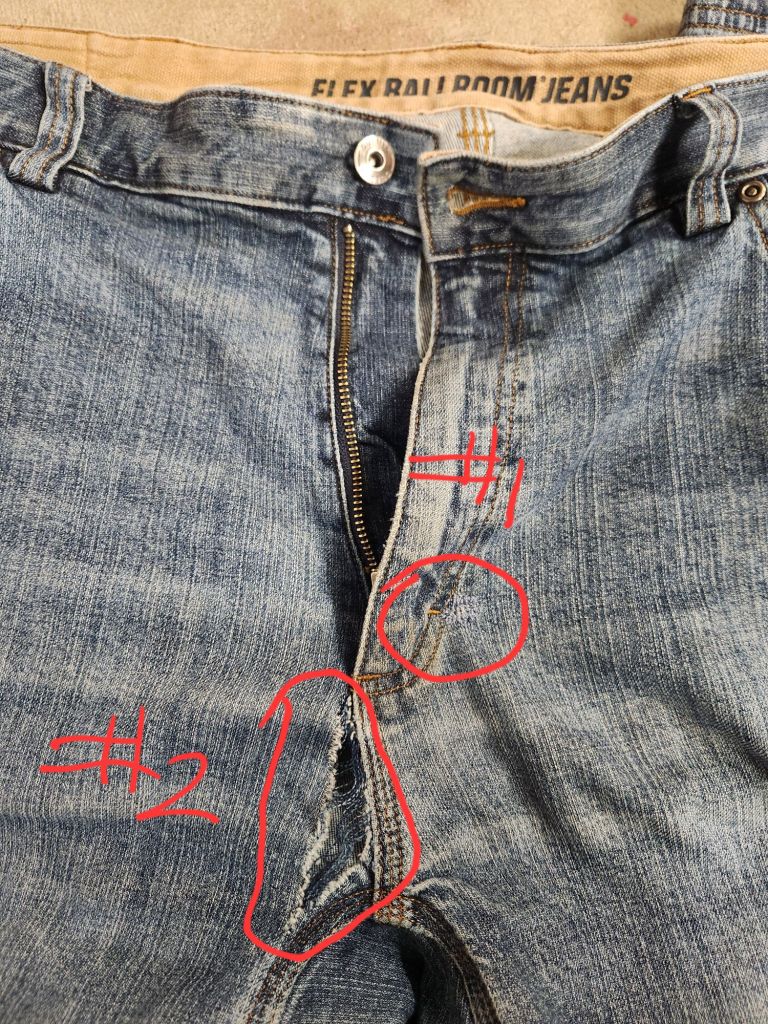
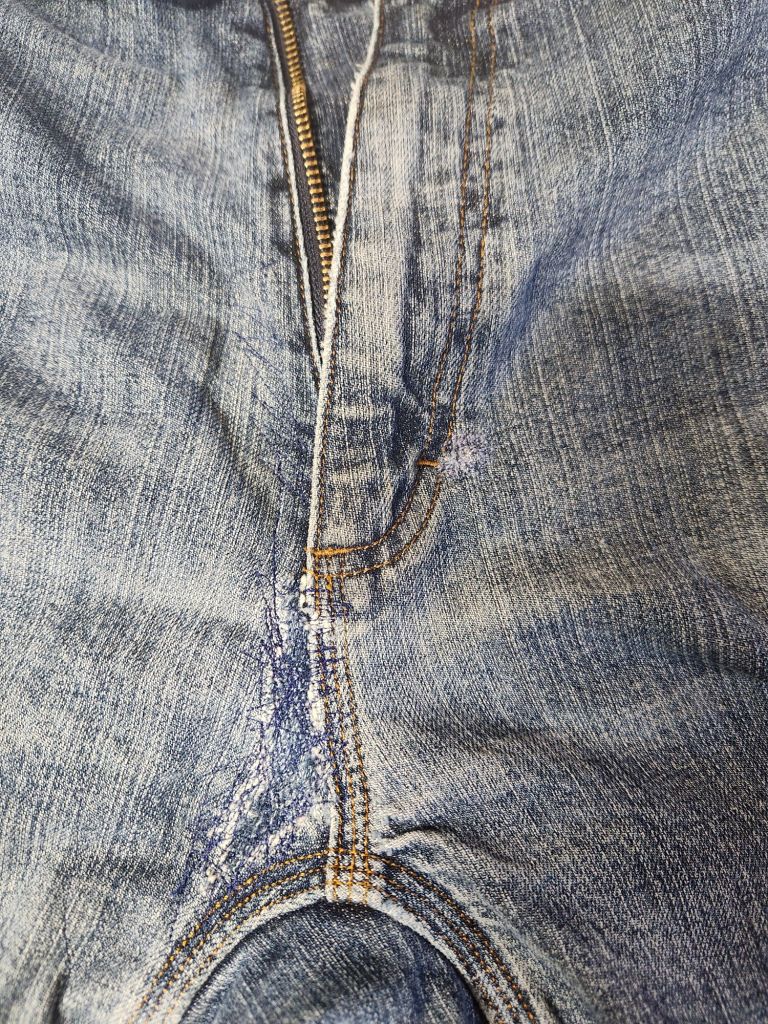
This particular pair of pants got a poke hole near the zip (#1, below, which is post repair), which I hand darned speedily and sloppily. It’s got a little piece of interfacing or some such behind it. The good news is it seems to have held up for another dozen washes so far.

And then he ripped the crotch on the other side, from the zip down, sort of shredding the fabric there (#2, below). I almost tossed the pants, but the fabric looked so good otherwise that I decided to patch the inside and darn over the whole thing on my machine. (Dreams of a professional darning machine; drools in sleep).

Materials used:

  • ripped jeans
  • old jeans to harvest some fabric
  • various semi-matching threads – a dark and a medium blue, in this case (husband does not care what repairs look like)
  • sewing machine with a narrow foot, so I could get as close to the fly as possible and a wider toe foot for zigzag / overcasting

Method:

  1. Cut the sacrificial denim big enough that it can be tacked on well over the damaged area. Don’t go too big. We don’t want to create too much bulk.
  2. Overcast the patch edges to prevent fraying.
  3. Prep the damaged pants. In this case, I decided not to trim any of the frayed area. The hole was about 1″ by 2 1/2″ and all the yarns one direction were in tact. If the hole had been worse, I might have cut out the damaged part.
  4. Pin patch in place from the outside.
  5. Usually I’ll zigzag the fabric on to avoid having a hard stitch line that can create weak spots in the future, but I was stitching over the bottom of the crotch seam edge, which is several thicknesses; I just straight stitched.
  6. Drop your feed dogs and either zigzag all over the frayed area, straying into the “healthy” fabric a bit, or do the same with straight stitch back and forth (and back and forth, and back and forth…). Essentially, you’re creating new fabric.
    • I was a little afraid that the rip would travel up from it’s present location, all along the edge of the zip, so I stitched up there, about 2″ above the bottom curve of the fly, a fair amount.

The result is not beautiful or invisible, but also not terribly obvious. They’ve been worn and washed a couple times and are holding up so far. Actually, he didn’t notice which pair had the repair, so good job me.

I don’t know if you’ve tried repairing a shoe before, but it’s a pain in the butt. Not only can leather be a pain to sew through, if you don’t have the right tools, but the presence of a sole means you have to maneuver and shift the shoe around constantly, trying to get a good angle. Not my favorite task!

Lazy Sunday work in progress

A few weeks ago I bought a pair of lightly felted wool booties that I plan to wear as slippers. They have an outdoor sole and built in arch support! And I got a good deal on them. Did I already know I am somewhat allergic to wool? Yes. Did I read the reviews that said the cuff scratched some people raw when worn without socks? I did. Did I buy them anyway? I did. I’m not going to get into a whole review of this bootie here, but they are definitely flawed. I wore them for about 4 days before I too had little raw spots on my ankles. It was time for an upgrade!

Supplies and Tools:

  • 1 strip of leather, about 18″ x 2.5″ – from the stash
  • Coordinating thread, nothing special. I used Coats & Clark poly – from the stash
  • Seam Ripper, Needle, Fabric Clips, Thimble and Snips
Tools on a me made needle book. That’s a Medieval style thimble. Definitely my favorite type.

So, a cost free upgrade!

The booties are made of two different types of wool. The main part is a thick, somewhat felted, wool pad. It seems to be felted just enough for me, or possibly my feet are more resistant to wool itchies than my neck in a softer wool sweater. The problem is that the trim is made of a rougher wool. That was a poor design decision and probably the reason I got such a deal. No matter – I have the skills to improve them!

My solution was to remove the trim, which was similar to a bias binding, and replace it with a soft and flexible strip of leather that had been in my stash for probably 20 years. The strips ended up being about 1.25 inches wide, with plenty of length to overlap the ends.

I started by back stitching the right side of my leather strip to the outer top edge of the bootie. My intent was to have the leather only show a little in the outside, which allows max length inside to protect as much of my ankle as possible.

After stitching the top edge, which is the section that will show, I turned the leather to the inside and secured it with clips to make sure the leather would lay as flat as possible. After some stretching and fussing, I got it pretty flat. Of course, it’s not really possible to stitch on the inside of a small hole with all those clips in the way, so I had to remove them and re-pin short areas as I progressed. I used a straight needle to sort of hem stitch. I went through the edge of the leather, but only caught part of the wool thickness, at an angle. I overlapped the ends inside, down at the bottom of the curve and secured it, again, going for max coverage of the wool. I think it’s a good improvement!

One note on supplies: A lot of people would use a curved needle for the inside part. While that would facilitate getting the needle all the way down through the fabric – without getting it jammed into the foot-bed – I always find curved needles hard to hold. I do better with a larger curved needle, but those are also thicker and wouldn’t work in this project. I pretty much always opt for a straight needle and a good thimble.

Now, what’s next?